Source : https://www.hgtv.com
Crafty Recycling: Toilet Paper Roll Crafts for Adults is a great way to get creative and have fun while being environmentally friendly. With a few simple supplies, you can create beautiful and unique pieces of art from something that would otherwise be thrown away. From wall art to jewelry, this book provides step-by-step instructions for creating a variety of projects that will spark your creativity and help you reduce your waste. Whether you’re a beginner or an experienced crafter, you’ll find something to love in this book. So grab your supplies and get ready to get crafty!
Get Creative with Toilet Paper Roll Crafts: Ideas for Adults to Reuse and Recycle
Toilet paper rolls are a great way to reuse and recycle materials for creative projects. With a few simple supplies, adults can create a variety of crafts that are both fun and functional. Here are some ideas for toilet paper roll crafts that adults can make.
One of the most popular toilet paper roll crafts is a jewelry holder. To make this craft, simply cut the toilet paper roll into thin strips and glue them together in a circular shape. Once the glue has dried, paint the holder in a color of your choice. You can then use the holder to store jewelry, such as necklaces, bracelets, and earrings.
Another great craft is a wall organizer. To make this craft, cut the toilet paper roll into thin strips and glue them together in a rectangular shape. Once the glue has dried, paint the organizer in a color of your choice. You can then use the organizer to store items such as keys, mail, and other small items.
Toilet paper rolls can also be used to make a decorative wreath. To make this craft, cut the toilet paper roll into thin strips and glue them together in a circular shape. Once the glue has dried, paint the wreath in a color of your choice. You can then use the wreath to decorate your home or office.
Finally, toilet paper rolls can be used to make a bird feeder. To make this craft, cut the toilet paper roll into thin strips and glue them together in a circular shape. Once the glue has dried, paint the bird feeder in a color of your choice. You can then use the bird feeder to attract birds to your garden or backyard.
These are just a few of the many creative ways adults can reuse and recycle toilet paper rolls for crafts. With a few simple supplies, adults can create a variety of crafts that are both fun and functional.
Upcycling Toilet Paper Rolls: Creative Craft Projects to Inspire Your Inner Artist
Upcycling toilet paper rolls is an increasingly popular way to repurpose everyday items into creative craft projects. This article will explore the potential of upcycling toilet paper rolls and provide a range of inspiring craft projects to get your creative juices flowing.
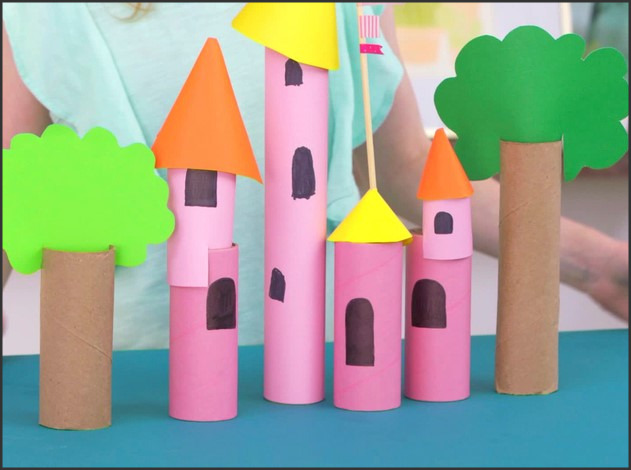
Toilet paper rolls are a great material for crafting due to their lightweight, malleable nature. They can be easily cut, folded, and glued into a variety of shapes and sizes. This makes them ideal for creating a range of decorative items, such as wall hangings, jewelry, and even furniture.
One of the most popular ways to upcycle toilet paper rolls is to create decorative wall hangings. These can be as simple or as intricate as you like, and can be used to add a unique touch to any room. For example, you could create a wall hanging featuring a pattern of interlocking circles, or a more complex design featuring multiple colors and shapes.
Another great way to upcycle toilet paper rolls is to create jewelry. You can use the rolls to create earrings, necklaces, and even bracelets. You can also use them to create decorative charms for keychains or zipper pulls.
Finally, you can use toilet paper rolls to create furniture. For example, you could create a coffee table or side table by gluing several rolls together and then painting them in a color of your choice. You could also use them to create a unique chair or stool.
Upcycling toilet paper rolls is a great way to get creative and repurpose everyday items into something unique and beautiful. With a little imagination and some basic crafting skills, you can create a range of decorative items and furniture pieces that will add a unique touch to any room. So why not give it a try and see what you can create?Crafty Recycling: Toilet Paper Roll Crafts for Adults to Spark Creativity is a great way to get creative and have fun while also being environmentally friendly. With a few simple supplies and a little bit of imagination, you can create beautiful and unique pieces of art from something that would otherwise be thrown away. Not only is it a great way to express yourself, but it also helps to reduce waste and save resources. So, if you’re looking for a fun and creative way to get creative, give Crafty Recycling a try!