Grand Entrance: Ideas for Enhancing Your Entry Hall with Style

Source : https://www.inyouths.com

Grand Entrance: Ideas for Enhancing Your Entry Hall with Style is a comprehensive guide to creating a beautiful and inviting entryway. It provides readers with a wealth of ideas for creating a grand entrance that will make a lasting impression on visitors. From selecting the right furniture and accessories to choosing the perfect color palette, this book offers a wealth of tips and tricks for creating a stunning entryway. Whether you’re looking to create a modern, contemporary look or a more traditional, classic style, this book has something for everyone. With its helpful advice and inspiring photos, Grand Entrance: Ideas for Enhancing Your Entry Hall with Style is the perfect resource for anyone looking to create a grand entrance that will make a lasting impression.

How to Create a Grand Entrance with Color: Tips for Enhancing Your Entry Hall with Style

Creating a grand entrance with color is an effective way to enhance the style of your entry hall. By carefully selecting the right colors and textures, you can create a welcoming and inviting atmosphere that will make a lasting impression on visitors. Here are some tips for creating a grand entrance with color:

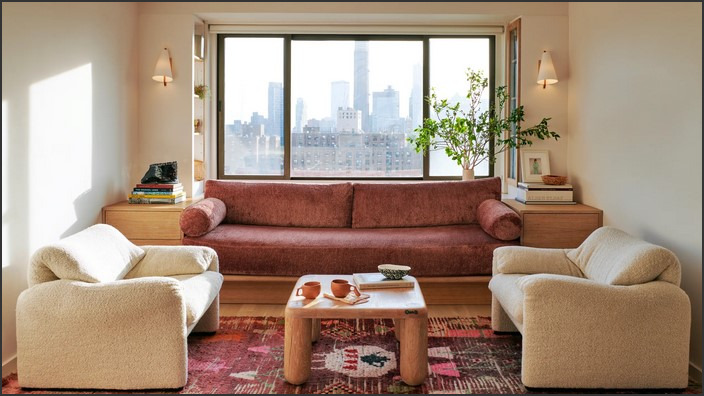
1. Choose a Bold Color Palette: Selecting a bold color palette is the first step in creating a grand entrance. Choose colors that will make a statement and draw attention to the entry hall. Consider colors that are bright and vibrant, such as reds, oranges, and yellows. You can also opt for more muted tones, such as blues and greens, to create a more calming atmosphere.

2. Incorporate Textures: Incorporating different textures into your color scheme can add depth and interest to the space. Consider adding a textured wallpaper or a patterned rug to the floor. You can also add texture to the walls with a faux finish or a stenciled pattern.

3. Add Accent Pieces: Accent pieces, such as artwork, sculptures, and furniture, can add a unique touch to the entry hall. Choose pieces that will complement the color palette and create a cohesive look.

4. Use Lighting: Lighting is an important element in creating a grand entrance. Consider adding a chandelier or wall sconces to the entry hall to create a dramatic effect. You can also use track lighting to highlight artwork or other accent pieces.

By following these tips, you can create a grand entrance with color that will make a lasting impression on visitors. With careful planning and attention to detail, you can create an inviting and stylish entry hall that will be the envy of your guests.

Making a Statement with Your Entry Hall: Ideas for Adding Visual Interest to Your Grand Entrance

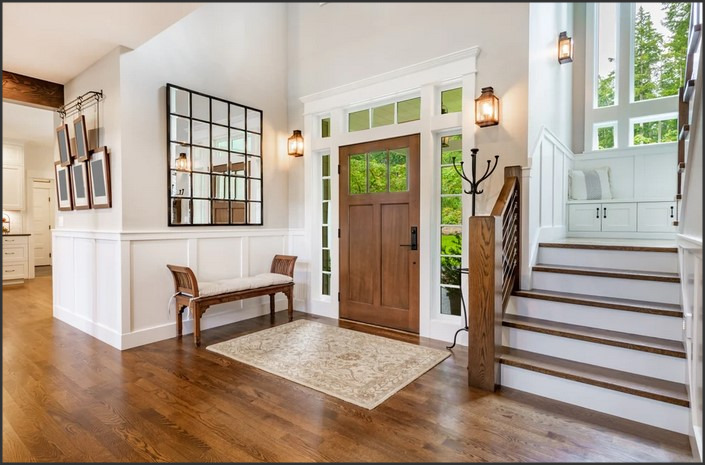
The entry hall of a home is the first impression visitors get of the interior of the house. It is important to make sure that the entry hall is inviting and visually interesting. Here are some ideas for adding visual interest to your grand entrance.

1. Hang a statement piece of art. A large painting or sculpture can be a great way to make a statement in the entry hall. Choose a piece that reflects your personal style and adds a touch of sophistication to the space.

2. Add a rug. A rug can be a great way to add color and texture to the entry hall. Choose a rug that complements the existing décor and adds a touch of warmth to the space.

3. Install a mirror. Mirrors can be a great way to make a small entry hall appear larger. Choose a mirror with an interesting frame to add visual interest to the space.

4. Add a console table. A console table can be a great way to add storage and display space to the entry hall. Choose a table with an interesting shape or design to add visual interest to the space.

5. Hang a chandelier. A chandelier can be a great way to add a touch of elegance to the entry hall. Choose a chandelier with an interesting shape or design to add visual interest to the space.

By following these tips, you can make sure that your entry hall is inviting and visually interesting. With the right pieces, you can create a grand entrance that will make a lasting impression on your guests.Grand Entrance: Ideas for Enhancing Your Entry Hall with Style is a great resource for anyone looking to add a touch of style and sophistication to their entry hall. From choosing the right furniture and accessories to creating a welcoming atmosphere, this book provides a wealth of ideas and inspiration. Whether you’re looking to create a grand entrance or just add a few subtle touches, this book is sure to help you create a beautiful and inviting entry hall.

There are many reasons that people find themselves in need of a mobile storage solution like K-BOX. Renting a mobile K-BOX container allows you to load items just once and have those items remain secure until you are ready to unpack. K-BOX Mobile Storage is locally owned in Tulsa. We deliver portable moving storage containers. The K-BOX moving and storage system is a user-friendly way to move or store your things. We drop off a sturdy, secure, weatherproof portable container at your location.

Crafty Coffee: DIY Coffee Table Plans for a Personalized Living Room

Source : https://media.architecturaldigest.com

Welcome to Crafty Coffee! If you’re looking for a unique and personalized way to spruce up your living room, then you’ve come to the right place. We offer a variety of DIY coffee table plans that will help you create a one-of-a-kind piece of furniture that will be the centerpiece of your living room. Our plans are easy to follow and can be customized to fit your individual style and needs. With our help, you can create a beautiful and functional coffee table that will be the envy of all your friends. So let’s get started and create something special!

How to Create a Unique Coffee Table for Your Living Room: DIY Coffee Table Plans

Creating a unique coffee table for your living room can be a fun and rewarding DIY project. With the right materials and tools, you can create a beautiful and functional piece of furniture that will be the centerpiece of your living room. This guide will provide you with step-by-step instructions on how to create a unique coffee table for your living room.

Materials Needed:

-Wooden boards (2x4s, 2x6s, etc.)

-Wood glue

-Screws

-Table saw

-Drill

-Sandpaper

-Stain or paint

-Table legs

Step 1: Measure and Cut the Wood. Measure the desired size of your coffee table and cut the wooden boards to the appropriate size using a table saw. Make sure to wear safety goggles and gloves when using the saw.

Step 2: Assemble the Table Top. Apply wood glue to the edges of the boards and secure them together with screws. Allow the glue to dry before proceeding.

Step 3: Sand and Stain/Paint the Table Top. Use sandpaper to smooth out the surface of the table top. Once the surface is smooth, apply a stain or paint to the table top. Allow the stain or paint to dry before proceeding.

Step 4: Attach the Table Legs. Measure the height of the table top and cut the table legs to the appropriate size. Attach the legs to the table top using screws.

Step 5: Enjoy Your New Coffee Table. Place your new coffee table in your living room and enjoy!

By following these steps, you can create a unique coffee table for your living room. With the right materials and tools, you can create a beautiful and functional piece of furniture that will be the centerpiece of your living room.

Get Creative with Your Coffee Table: DIY Coffee Table Projects to Personalize Your Home

Coffee tables are an essential part of any living room, providing a place to set drinks, snacks, and decorative items. However, many people find that their coffee tables are too plain or generic, lacking the personal touch that makes a home truly unique. Fortunately, there are a variety of DIY coffee table projects that can help you customize your living space and add a unique flair to your home.

One of the simplest ways to personalize your coffee table is to paint it. Choose a color that complements the rest of your décor and use a brush or roller to apply the paint. If you’re feeling adventurous, you can also use stencils to create a pattern or design on the table. Another option is to use decoupage to add a unique design to the table. Choose a pattern or image that you like and use decoupage glue to attach it to the table.

If you’re looking for a more complex project, you can build a coffee table from scratch. Start by measuring the space where the table will go and then use woodworking tools to cut the pieces to size. Once the pieces are cut, you can assemble them using nails, screws, or glue. You can also add decorative touches such as trim or molding to give the table a more finished look.

Finally, you can use upcycled materials to create a unique coffee table. For example, you can use an old door or window frame as the base of the table and then add a piece of glass or wood on top. You can also use old crates or boxes to create a rustic-looking table.

No matter what type of project you choose, DIY coffee table projects are a great way to add a personal touch to your home. With a little creativity and some basic tools, you can create a unique and stylish coffee table that will be the centerpiece of your living room.Crafty Coffee’s DIY Coffee Table Plans are a great way to add a personalized touch to any living room. With a variety of styles and sizes to choose from, you can easily find the perfect coffee table to fit your space and style. The plans are easy to follow and the materials are affordable, making it a great project for any DIY enthusiast. With Crafty Coffee’s DIY Coffee Table Plans, you can create a unique and stylish coffee table that will be the centerpiece of your living room.

Paving the Way: Understanding the Cost of Pavers for Your Outdoor Projects

Paving the Way: Understanding the Cost of Pavers for Your Outdoor Projects is a comprehensive guide to help you understand the cost of pavers for your outdoor projects. This guide will provide you with an overview of the different types of pavers available, the cost of each type, and the factors that can affect the cost of your project. It will also provide you with tips and tricks to help you save money on your project. With this guide, you will be able to make an informed decision when it comes to selecting the right pavers for your outdoor project.

Exploring the Different Types of Pavers and Their Costs: What You Need to Know Before Starting Your Outdoor Project

When planning an outdoor project, it is important to consider the different types of pavers and their associated costs. Pavers are a popular choice for outdoor projects due to their durability, versatility, and aesthetic appeal. There are a variety of paver materials available, each with its own unique characteristics and cost. This article will explore the different types of pavers and their associated costs, helping you make an informed decision when selecting the right paver for your project.

The most common type of paver is concrete. Concrete pavers are available in a variety of colors, shapes, and sizes, making them a popular choice for outdoor projects. Concrete pavers are also relatively inexpensive, with prices ranging from $2 to $10 per square foot. However, concrete pavers are not as durable as other types of pavers and may require more maintenance over time.

Brick pavers are another popular choice for outdoor projects. Brick pavers are more expensive than concrete pavers, with prices ranging from $10 to $20 per square foot. However, brick pavers are more durable and require less maintenance than concrete pavers. Additionally, brick pavers come in a variety of colors and shapes, allowing you to create a unique look for your outdoor project.

Stone pavers are the most expensive type of paver, with prices ranging from $20 to $50 per square foot. Stone pavers are extremely durable and require minimal maintenance. Additionally, stone pavers come in a variety of colors and shapes, allowing you to create a unique look for your outdoor project.

Finally, rubber pavers are a relatively new type of paver that is becoming increasingly popular. Rubber pavers are made from recycled tires and are extremely durable and slip-resistant. Rubber pavers are also relatively inexpensive, with prices ranging from $2 to $10 per square foot.

When selecting the right paver for your outdoor project, it is important to consider the different types of pavers and their associated costs. Each type of paver has its own unique characteristics and cost, so it is important to do your research and select the right paver for your project. With the right paver, you can create a beautiful and durable outdoor space that will last for years to come.

How to Calculate the Cost of Your Paver Project: A Guide to Understanding the Factors That Impact Price

Calculating the cost of a paver project can be a daunting task, as there are many factors that can influence the final price. Understanding the various elements that impact the cost of a paver project is essential for budgeting and planning. This guide will provide an overview of the factors that can affect the cost of a paver project, as well as tips for calculating the total cost.

The first factor to consider when calculating the cost of a paver project is the type of paver being used. Different types of pavers have different prices, and the cost of the project will depend on the type of paver chosen. For example, natural stone pavers are typically more expensive than concrete pavers. Additionally, the size of the pavers can also affect the cost, as larger pavers will require more material and labor.

The second factor to consider is the size of the project. The larger the project, the more material and labor will be required, and the higher the cost will be. Additionally, the complexity of the project can also affect the cost. Projects that require intricate designs or complex patterns will require more time and labor, and thus will be more expensive.

The third factor to consider is the labor costs associated with the project. Labor costs can vary depending on the complexity of the project, the number of workers needed, and the experience of the workers. Additionally, the cost of materials will also affect the total cost of the project. Materials such as sand, gravel, and cement will need to be purchased, and the cost of these materials will need to be factored into the total cost.

Finally, the cost of installation should also be taken into account. Installation costs can vary depending on the complexity of the project, the number of workers needed, and the experience of the workers. Additionally, the cost of any necessary equipment or tools should also be factored into the total cost.

By understanding the various factors that can affect the cost of a paver project, it is possible to accurately calculate the total cost. Additionally, it is important to factor in any additional costs such as installation and materials. By taking all of these factors into account, it is possible to accurately calculate the total cost of a paver project.Paving the Way: Understanding the Cost of Pavers for Your Outdoor Projects is an invaluable resource for anyone looking to install pavers in their outdoor space. It provides a comprehensive overview of the different types of pavers available, the cost of each type, and the factors that can affect the cost of installation. With this information, homeowners can make an informed decision about the best type of paver for their project and budget. Ultimately, this guide will help homeowners create a beautiful outdoor space that will last for years to come.

Path of Elegance: How to Build a Brick Walkway for Timeless Charm

Path of Elegance: How to Build a Brick Walkway for Timeless Charm is a comprehensive guide to creating a beautiful and timeless brick walkway. This guide will provide you with all the information you need to create a stunning walkway that will last for years to come. From choosing the right materials to laying the bricks, this guide will walk you through the entire process step-by-step. With the help of this guide, you can create a walkway that will add charm and elegance to your home.

Step-by-Step Guide to Installing a Brick Walkway for Timeless Elegance

Installing a brick walkway is a great way to add timeless elegance to any outdoor space. With a few simple steps, you can create a beautiful and durable walkway that will last for years to come.

Step 1: Prepare the Site

Before you begin, you will need to prepare the site for the walkway. Start by clearing the area of any debris, such as rocks, sticks, and leaves. Then, use a shovel to level the ground and remove any large roots or other obstructions.

Step 2: Lay the Foundation

Once the site is prepared, you can begin laying the foundation for the walkway. Start by laying down a layer of gravel or crushed stone. This will provide a stable base for the bricks and help with drainage.

Step 3: Install the Edging

Next, you will need to install the edging for the walkway. This can be done with either plastic or metal edging. Make sure to secure the edging in place with stakes or other anchors.

Step 4: Lay the Bricks

Now it’s time to lay the bricks. Start at one end of the walkway and work your way to the other. Make sure to use a level to ensure that the bricks are even and level.

Step 5: Fill in the Gaps

Once the bricks are laid, you will need to fill in the gaps between them. This can be done with either sand or mortar. Make sure to use a trowel to spread the material evenly.

Step 6: Seal the Walkway

Finally, you will need to seal the walkway. This will help protect the bricks from the elements and keep them looking great for years to come. Use a sealant specifically designed for brick walkways and follow the manufacturer’s instructions.

By following these steps, you can easily install a beautiful and durable brick walkway that will add timeless elegance to any outdoor space. With a little bit of time and effort, you can create a walkway that will last for years to come.

Design Tips for Creating a Path of Elegance with a Brick Walkway

Creating a brick walkway is a great way to add a touch of elegance to any outdoor space. Here are some design tips to help you create a path of elegance with a brick walkway:

1. Choose the Right Brick: Selecting the right brick is essential for creating a path of elegance. Consider the size, shape, and color of the brick to ensure it complements the surrounding landscape.

2. Create a Pattern: Create a pattern with the bricks to add visual interest to the walkway. Consider alternating the brick colors or laying them in a herringbone pattern.

3. Incorporate Edging: Incorporate edging along the sides of the walkway to give it a finished look. Consider using a contrasting material such as stone or metal to create a border.

4. Add Lighting: Adding lighting to the walkway will create a warm and inviting atmosphere. Consider using solar-powered lights or low-voltage LED lights to illuminate the path.

By following these design tips, you can create a path of elegance with a brick walkway. With the right materials and design elements, you can create a beautiful and inviting outdoor space.Path of Elegance: How to Build a Brick Walkway for Timeless Charm is an excellent guide for anyone looking to add a classic and timeless charm to their outdoor space. With detailed instructions and helpful tips, this guide provides all the information needed to build a beautiful brick walkway. Whether you are a beginner or an experienced DIYer, this guide will help you create a stunning walkway that will last for years to come.

Concrete Elegance: A Guide on How to Pour a Concrete Patio

Concrete Elegance: A Guide on How to Pour a Concrete Patio is a comprehensive guide to creating a beautiful and durable concrete patio. This guide provides step-by-step instructions on how to prepare the area, mix and pour the concrete, and finish the patio. It also includes tips on how to choose the right materials, tools, and techniques to ensure a successful project. With this guide, you can create a stunning patio that will last for years to come.

Step-by-Step Guide to Pouring a Concrete Patio: Tips from Concrete Elegance

Pouring a concrete patio is a great way to add value and beauty to your outdoor space. With the right preparation and materials, you can create a beautiful and durable patio that will last for years to come. Here is a step-by-step guide from Concrete Elegance to help you get started.

Step 1: Prepare the Site

Before you begin pouring the concrete, you need to prepare the site. Start by removing any existing vegetation and debris from the area. Then, use a shovel to level the ground and create a flat surface. If necessary, you can use a tamper to compact the soil.

Step 2: Install the Forms

Once the site is prepared, you can begin installing the forms. These are the wooden or plastic boards that will contain the concrete and give it its shape. Make sure the forms are level and secure them in place with stakes.

Step 3: Add the Rebar

Rebar is a type of steel reinforcement that will help strengthen the concrete. Place the rebar in the forms and make sure it is evenly spaced.

Step 4: Pour the Concrete

Once the forms and rebar are in place, you can begin pouring the concrete. Start at one end of the patio and work your way to the other. Use a trowel to smooth out the surface and make sure there are no air pockets.

Step 5: Finish the Concrete

Once the concrete has been poured, you can begin finishing it. Use a float to smooth out the surface and create a uniform texture. You can also use a trowel to create a pattern or texture on the surface.

Step 6: Cure the Concrete

Once the concrete has been finished, you need to let it cure. This process can take up to 28 days, so be patient. During this time, keep the concrete moist by spraying it with water.

Step 7: Seal the Concrete

Once the concrete has cured, you can seal it with a concrete sealer. This will help protect the surface from stains and damage.

Following these steps will help you create a beautiful and durable concrete patio. With the right preparation and materials, you can create a patio that will last for years to come.

How to Achieve a Professional Look with Concrete Elegance: Tips for Pouring a Concrete Patio

Creating a professional-looking concrete patio is a great way to add value to your home and create an outdoor living space that you can enjoy for years to come. With the right preparation and materials, you can achieve a beautiful and durable concrete patio that will last for years. Here are some tips for pouring a concrete patio that will help you achieve a professional look with concrete elegance.

1. Start with a Solid Foundation: Before you begin pouring your concrete patio, it is important to make sure that the foundation is solid and level. This will ensure that your patio is even and will not crack or settle over time. Make sure to use a quality concrete mix and to follow the manufacturer’s instructions for proper curing and drying times.

2. Use Quality Materials: Using quality materials is essential for achieving a professional look with concrete elegance. Make sure to use a concrete mix that is designed for outdoor use and that is rated for the weight of the patio furniture and other items that will be placed on the patio.

3. Prepare the Area: Before you begin pouring the concrete, make sure to prepare the area by removing any debris, weeds, and other obstacles. This will help ensure that the concrete is even and will not crack or settle over time.

4. Use the Right Tools: Using the right tools is essential for achieving a professional look with concrete elegance. Make sure to use a trowel to smooth out the concrete and a level to make sure that the patio is even.

5. Seal the Concrete: After the concrete has been poured and cured, it is important to seal the concrete to protect it from the elements. This will help ensure that your patio looks great for years to come.

By following these tips, you can achieve a professional look with concrete elegance when pouring a concrete patio. With the right preparation and materials, you can create an outdoor living space that you can enjoy for years to come.Concrete Elegance: A Guide on How to Pour a Concrete Patio is an invaluable resource for anyone looking to create a beautiful and durable concrete patio. With detailed instructions and helpful tips, this guide provides all the information needed to successfully pour a concrete patio. Whether you are a novice or an experienced DIYer, this guide will help you create a stunning outdoor space that will last for years to come.