Laundry Luxe: Basement Laundry Room Ideas for Efficiency and Style

Source : https://nextluxury.com

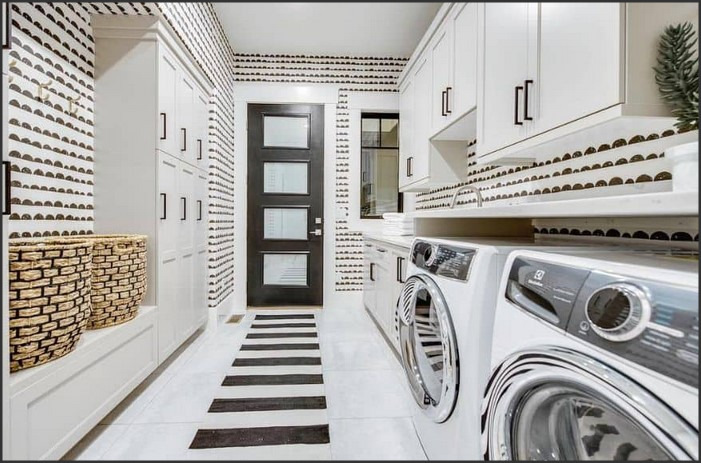
Laundry Luxe is a great resource for anyone looking to create a stylish and efficient basement laundry room. Whether you’re looking to upgrade an existing space or create a brand new one, Laundry Luxe has all the tips and tricks you need to make the most of your laundry room. From clever storage solutions to stylish decor ideas, Laundry Luxe has everything you need to make your basement laundry room a functional and stylish space. With their helpful advice and inspiring ideas, you can create a laundry room that is both efficient and stylish.

How to Create a Stylish and Efficient Basement Laundry Room with Laundry Luxe

Creating a stylish and efficient basement laundry room can be a daunting task. However, with the right planning and the right products, it can be a rewarding and enjoyable experience. Laundry Luxe offers a range of products that can help you create a beautiful and functional basement laundry room.

The first step in creating a stylish and efficient basement laundry room is to plan the layout. Consider the size of the room and the amount of space you have available. Think about the type of appliances you will need and the type of storage you will need. Once you have a plan in place, you can begin to select the products that will help you create the perfect laundry room.

Laundry Luxe offers a range of products that can help you create a stylish and efficient basement laundry room. From laundry cabinets and storage solutions to laundry hampers and drying racks, Laundry Luxe has everything you need to create a beautiful and functional laundry room.

Laundry Luxe also offers a range of accessories that can help you create a stylish and efficient basement laundry room. From laundry baskets and laundry bags to laundry sorters and laundry carts, Laundry Luxe has everything you need to make your laundry room look great and function efficiently.

Finally, Laundry Luxe offers a range of laundry detergents and fabric softeners that can help you keep your laundry looking and smelling great. With the right products, you can create a stylish and efficient basement laundry room that will make doing laundry a pleasure.

Creating a stylish and efficient basement laundry room with Laundry Luxe is easy and rewarding. With the right planning and the right products, you can create a beautiful and functional laundry room that will make doing laundry a pleasure.

Maximizing Space and Efficiency in Your Basement Laundry Room with Laundry Luxe Solutions

Basements are often overlooked as a potential space for laundry rooms, but with the right design and organization, they can be transformed into efficient and functional laundry spaces. Laundry Luxe Solutions offers a range of products that can help maximize space and efficiency in your basement laundry room.

The first step in creating an efficient basement laundry room is to make sure you have the right equipment. Laundry Luxe Solutions offers a variety of washers and dryers that are designed to fit in tight spaces. Their stackable washer and dryer units are perfect for small basements, as they can be installed side-by-side to save space. They also offer front-loading washers and dryers, which are ideal for larger basements.

Once you have the right equipment, it’s time to organize your space. Laundry Luxe Solutions offers a range of storage solutions to help you keep your laundry room organized. Their laundry carts are perfect for storing detergents, fabric softeners, and other laundry supplies. They also offer shelving units and cabinets that can be used to store folded clothes and other items.

Finally, Laundry Luxe Solutions offers a range of accessories that can help make your basement laundry room more efficient. Their folding tables are perfect for folding clothes, while their ironing boards can help you quickly press clothes. They also offer a range of hampers and baskets that can help you keep your laundry room neat and tidy.

By utilizing the products offered by Laundry Luxe Solutions, you can maximize space and efficiency in your basement laundry room. Their products are designed to help you create an organized and efficient laundry space that will make doing laundry a breeze.Laundry Luxe provides a great way to make the most of your basement laundry room. With their efficient and stylish ideas, you can create a space that is both functional and aesthetically pleasing. Whether you are looking for a way to maximize storage, create a more organized space, or just want to add a touch of style to your laundry room, Laundry Luxe has the perfect solution for you.

There are many reasons that people find themselves in need of a mobile storage solution like K-BOX. Renting a mobile K-BOX container allows you to load items just once and have those items remain secure until you are ready to unpack. K-BOX Mobile Storage is locally owned in Tulsa. We deliver portable moving storage containers. The K-BOX moving and storage system is a user-friendly way to move or store your things. We drop off a sturdy, secure, weatherproof portable container at your location.

Fireside Facelift: Transforming Your Space with a Painted Stone Fireplace

Source : https://www.google.com

Fireside Facelift is a unique and creative way to transform your living space with a painted stone fireplace. Whether you are looking to add a touch of elegance to your home or simply want to update the look of your existing fireplace, Fireside Facelift can help you achieve the look you desire. With a variety of colors and textures to choose from, you can create a one-of-a-kind fireplace that will be the focal point of your room. With the help of Fireside Facelift, you can easily and affordably transform your space with a painted stone fireplace.

How to Transform Your Space with a Painted Stone Fireplace: Tips and Tricks for a Fireside Facelift

A painted stone fireplace can be a great way to transform a space and give it a fresh, modern look. Whether you’re looking to update an existing fireplace or create a new one, there are a few tips and tricks to keep in mind when it comes to painting a stone fireplace.

First, it’s important to choose the right type of paint for the job. Latex paint is the best choice for a stone fireplace, as it is durable and easy to clean. Make sure to use a high-quality paint that is specifically designed for use on stone surfaces.

Next, it’s important to properly prepare the surface before painting. Start by cleaning the stone with a mild detergent and water. Then, use a wire brush to remove any dirt or debris that may be stuck in the crevices. Once the surface is clean, use a primer to seal the stone and ensure that the paint adheres properly.

When it comes to painting, it’s important to use even strokes and to take your time. Start with the edges and work your way in, using a brush or roller to apply the paint. Make sure to let each coat dry completely before applying the next.

Finally, it’s important to protect your newly painted stone fireplace. Use a sealant to protect the paint from dirt and moisture. This will help to ensure that your painted stone fireplace looks great for years to come.

With these tips and tricks, you can easily transform your space with a painted stone fireplace. With the right preparation and paint, you can create a beautiful and modern look that will last for years to come.

DIY Ideas for a Painted Stone Fireplace: Get the Look of a Fireside Facelift on a Budget

A painted stone fireplace can be a great way to give your living space a facelift on a budget. With a few simple steps, you can transform your fireplace from drab to fab in no time. Here are some DIY ideas for a painted stone fireplace that will help you get the look of a fireside facelift on a budget.

1. Start with a thorough cleaning. Before you begin painting, it’s important to make sure your stone fireplace is clean. Use a mild detergent and warm water to remove any dirt and debris. Allow the stone to dry completely before you begin painting.

2. Prime the stone. Priming the stone will help the paint adhere better and last longer. Use a high-quality primer designed for masonry surfaces and apply it with a brush or roller. Allow the primer to dry completely before you begin painting.

3. Choose the right paint. When selecting paint for your stone fireplace, make sure to choose a paint that is designed for masonry surfaces. This type of paint will be more durable and will provide better coverage.

4. Paint the stone. Once you’ve chosen the right paint, it’s time to start painting. Use a brush or roller to apply the paint in even strokes. Allow the paint to dry completely before applying a second coat.

5. Add a sealant. Once the paint has dried, it’s important to add a sealant to protect the paint and keep it looking fresh. Use a high-quality sealant designed for masonry surfaces and apply it with a brush or roller.

With these simple steps, you can give your stone fireplace a facelift on a budget. With a little bit of time and effort, you can transform your fireplace from drab to fab in no time.Fireside Facelift is an excellent way to transform your space with a painted stone fireplace. It is a cost-effective and easy way to give your fireplace a new look without having to replace the entire structure. With the right tools and materials, you can easily create a beautiful and unique fireplace that will be the centerpiece of your home. Fireside Facelift is a great way to add a touch of style and personality to your home.

Harvest Home: Craft a Corn Husk Wreath for a Cozy Fall Touch

Source : https://www.southernliving.com

Harvest Home: Craft a Corn Husk Wreath for a Cozy Fall Touch is a great way to add a touch of warmth and coziness to your home this fall. Corn husks are a great material to use for crafting, as they are lightweight, easy to work with, and can be used to create a variety of different wreaths. This tutorial will show you how to craft a corn husk wreath that is perfect for adding a cozy fall touch to your home. With just a few simple supplies and a bit of time, you can create a beautiful wreath that will last for years to come.

How to Make a Corn Husk Wreath for a Festive Harvest Home Decor

Creating a corn husk wreath is a great way to add a festive touch to your home for the harvest season. This project is easy to complete and requires minimal supplies. With a few simple steps, you can create a beautiful wreath that will bring a touch of the outdoors into your home.

Materials Needed:

– Corn husks

– Floral wire

– Scissors

– Hot glue gun

– Ribbon

Instructions:

1. Begin by gathering the corn husks. You can purchase them at a craft store or harvest them from a corn field.

2. Cut the husks into strips of varying lengths. The strips should be about 1/2 inch wide.

3. Take a piece of floral wire and wrap it around the center of the wreath form. This will act as the base for the wreath.

4. Begin attaching the husks to the wreath form by wrapping the strips around the wire. Secure each strip with a dab of hot glue.

5. Continue adding husks until the entire wreath form is covered.

6. Once the wreath is complete, add a ribbon for a finishing touch.

Your corn husk wreath is now ready to hang and enjoy! This project is a great way to bring a touch of the outdoors into your home for the harvest season.

Get Creative with Corn Husk Wreaths: Ideas for a Unique Fall Display

Corn husk wreaths are a unique and creative way to bring a touch of the fall season into your home. These wreaths are easy to make and can be customized to fit any style. Here are some ideas for creating a unique fall display with corn husk wreaths.

First, consider the size of the wreath. Corn husk wreaths come in a variety of sizes, from small to large. Choose a size that will fit the space you have available.

Next, decide on the color scheme. Corn husks come in a variety of colors, from light to dark. Choose colors that will complement the other decorations in your home.

Once you have chosen the size and color of the wreath, you can begin to decorate it. Consider adding dried flowers, pine cones, or other natural elements to the wreath. You can also add ribbons, beads, or other decorative items to give the wreath a unique look.

Finally, hang the wreath in a prominent place in your home. Consider hanging it on a door, wall, or window to create a beautiful fall display.

Corn husk wreaths are a great way to bring a touch of the fall season into your home. With a little creativity, you can create a unique and beautiful display that will last throughout the season.Harvest Home: Craft a Corn Husk Wreath for a Cozy Fall Touch is a great way to add a cozy, rustic touch to your home this fall. Not only is it a fun and easy craft to make, but it also adds a unique and beautiful decoration to your home. With just a few simple supplies, you can create a beautiful corn husk wreath that will bring a warm and inviting atmosphere to your home. Whether you choose to hang it on your door or display it on your wall, this wreath is sure to be a conversation starter and a great way to welcome the fall season.

Grand Entrance: Ideas for Enhancing Your Entry Hall with Style

Source : https://www.inyouths.com

Grand Entrance: Ideas for Enhancing Your Entry Hall with Style is a comprehensive guide to creating a beautiful and inviting entryway. It provides readers with a wealth of ideas for creating a grand entrance that will make a lasting impression on visitors. From selecting the right furniture and accessories to choosing the perfect color palette, this book offers a wealth of tips and tricks for creating a stunning entryway. Whether you’re looking to create a modern, contemporary look or a more traditional, classic style, this book has something for everyone. With its helpful advice and inspiring photos, Grand Entrance: Ideas for Enhancing Your Entry Hall with Style is the perfect resource for anyone looking to create a grand entrance that will make a lasting impression.

How to Create a Grand Entrance with Color: Tips for Enhancing Your Entry Hall with Style

Creating a grand entrance with color is an effective way to enhance the style of your entry hall. By carefully selecting the right colors and textures, you can create a welcoming and inviting atmosphere that will make a lasting impression on visitors. Here are some tips for creating a grand entrance with color:

1. Choose a Bold Color Palette: Selecting a bold color palette is the first step in creating a grand entrance. Choose colors that will make a statement and draw attention to the entry hall. Consider colors that are bright and vibrant, such as reds, oranges, and yellows. You can also opt for more muted tones, such as blues and greens, to create a more calming atmosphere.

2. Incorporate Textures: Incorporating different textures into your color scheme can add depth and interest to the space. Consider adding a textured wallpaper or a patterned rug to the floor. You can also add texture to the walls with a faux finish or a stenciled pattern.

3. Add Accent Pieces: Accent pieces, such as artwork, sculptures, and furniture, can add a unique touch to the entry hall. Choose pieces that will complement the color palette and create a cohesive look.

4. Use Lighting: Lighting is an important element in creating a grand entrance. Consider adding a chandelier or wall sconces to the entry hall to create a dramatic effect. You can also use track lighting to highlight artwork or other accent pieces.

By following these tips, you can create a grand entrance with color that will make a lasting impression on visitors. With careful planning and attention to detail, you can create an inviting and stylish entry hall that will be the envy of your guests.

Making a Statement with Your Entry Hall: Ideas for Adding Visual Interest to Your Grand Entrance

The entry hall of a home is the first impression visitors get of the interior of the house. It is important to make sure that the entry hall is inviting and visually interesting. Here are some ideas for adding visual interest to your grand entrance.

1. Hang a statement piece of art. A large painting or sculpture can be a great way to make a statement in the entry hall. Choose a piece that reflects your personal style and adds a touch of sophistication to the space.

2. Add a rug. A rug can be a great way to add color and texture to the entry hall. Choose a rug that complements the existing décor and adds a touch of warmth to the space.

3. Install a mirror. Mirrors can be a great way to make a small entry hall appear larger. Choose a mirror with an interesting frame to add visual interest to the space.

4. Add a console table. A console table can be a great way to add storage and display space to the entry hall. Choose a table with an interesting shape or design to add visual interest to the space.

5. Hang a chandelier. A chandelier can be a great way to add a touch of elegance to the entry hall. Choose a chandelier with an interesting shape or design to add visual interest to the space.

By following these tips, you can make sure that your entry hall is inviting and visually interesting. With the right pieces, you can create a grand entrance that will make a lasting impression on your guests.Grand Entrance: Ideas for Enhancing Your Entry Hall with Style is a great resource for anyone looking to add a touch of style and sophistication to their entry hall. From choosing the right furniture and accessories to creating a welcoming atmosphere, this book provides a wealth of ideas and inspiration. Whether you’re looking to create a grand entrance or just add a few subtle touches, this book is sure to help you create a beautiful and inviting entry hall.

Crafty Coffee: DIY Coffee Table Plans for a Personalized Living Room

Source : https://media.architecturaldigest.com

Welcome to Crafty Coffee! If you’re looking for a unique and personalized way to spruce up your living room, then you’ve come to the right place. We offer a variety of DIY coffee table plans that will help you create a one-of-a-kind piece of furniture that will be the centerpiece of your living room. Our plans are easy to follow and can be customized to fit your individual style and needs. With our help, you can create a beautiful and functional coffee table that will be the envy of all your friends. So let’s get started and create something special!

How to Create a Unique Coffee Table for Your Living Room: DIY Coffee Table Plans

Creating a unique coffee table for your living room can be a fun and rewarding DIY project. With the right materials and tools, you can create a beautiful and functional piece of furniture that will be the centerpiece of your living room. This guide will provide you with step-by-step instructions on how to create a unique coffee table for your living room.

Materials Needed:

-Wooden boards (2x4s, 2x6s, etc.)

-Wood glue

-Screws

-Table saw

-Drill

-Sandpaper

-Stain or paint

-Table legs

Step 1: Measure and Cut the Wood. Measure the desired size of your coffee table and cut the wooden boards to the appropriate size using a table saw. Make sure to wear safety goggles and gloves when using the saw.

Step 2: Assemble the Table Top. Apply wood glue to the edges of the boards and secure them together with screws. Allow the glue to dry before proceeding.

Step 3: Sand and Stain/Paint the Table Top. Use sandpaper to smooth out the surface of the table top. Once the surface is smooth, apply a stain or paint to the table top. Allow the stain or paint to dry before proceeding.

Step 4: Attach the Table Legs. Measure the height of the table top and cut the table legs to the appropriate size. Attach the legs to the table top using screws.

Step 5: Enjoy Your New Coffee Table. Place your new coffee table in your living room and enjoy!

By following these steps, you can create a unique coffee table for your living room. With the right materials and tools, you can create a beautiful and functional piece of furniture that will be the centerpiece of your living room.

Get Creative with Your Coffee Table: DIY Coffee Table Projects to Personalize Your Home

Coffee tables are an essential part of any living room, providing a place to set drinks, snacks, and decorative items. However, many people find that their coffee tables are too plain or generic, lacking the personal touch that makes a home truly unique. Fortunately, there are a variety of DIY coffee table projects that can help you customize your living space and add a unique flair to your home.

One of the simplest ways to personalize your coffee table is to paint it. Choose a color that complements the rest of your décor and use a brush or roller to apply the paint. If you’re feeling adventurous, you can also use stencils to create a pattern or design on the table. Another option is to use decoupage to add a unique design to the table. Choose a pattern or image that you like and use decoupage glue to attach it to the table.

If you’re looking for a more complex project, you can build a coffee table from scratch. Start by measuring the space where the table will go and then use woodworking tools to cut the pieces to size. Once the pieces are cut, you can assemble them using nails, screws, or glue. You can also add decorative touches such as trim or molding to give the table a more finished look.

Finally, you can use upcycled materials to create a unique coffee table. For example, you can use an old door or window frame as the base of the table and then add a piece of glass or wood on top. You can also use old crates or boxes to create a rustic-looking table.

No matter what type of project you choose, DIY coffee table projects are a great way to add a personal touch to your home. With a little creativity and some basic tools, you can create a unique and stylish coffee table that will be the centerpiece of your living room.Crafty Coffee’s DIY Coffee Table Plans are a great way to add a personalized touch to any living room. With a variety of styles and sizes to choose from, you can easily find the perfect coffee table to fit your space and style. The plans are easy to follow and the materials are affordable, making it a great project for any DIY enthusiast. With Crafty Coffee’s DIY Coffee Table Plans, you can create a unique and stylish coffee table that will be the centerpiece of your living room.