Source:https://www.deltafaucet.com
You are mid-way through prepping a massive family Sunday roast. You’ve got the pasta water going, the stock pot simmering, and the vegetables blanched. Then comes the dreaded “sink-to-stove shuffle.” You haul an eight-quart pot, heavy with sloshing water, across a slick kitchen floor, praying your lower back holds out and you don’t leave a trail of puddles behind you.
In my ten years of remodeling high-end kitchens and troubleshooting plumbing layouts, I’ve seen homeowners drop thousands on professional ranges while ignoring the most critical logistical bottleneck: water transport. This is where the Pot Filler Brass stops being a “luxury extra” and becomes a masterclass in culinary ergonomics and mechanical reliability.
The Ergonomic Revolution: Why Weight Matters
A standard gallon of water weighs approximately 8.34 pounds. When you fill a large stock pot at the sink and carry it to the range, you aren’t just moving water; you are exerting significant stress on your lumbar spine and wrists.
I’ve had clients tell me that after installing a Pot Filler Brass, their “kitchen fatigue” dropped significantly. It’s about Operational Flow. In professional contracting, we talk about the “Work Triangle” (the distance between the stove, sink, and fridge). A pot filler effectively deletes one entire leg of that triangle for every pasta night or soup prep you undertake.
The “Gas Station” Analogy
Think of your kitchen like a highway. Your sink is the main rest stop, but your stove is the long-haul destination. Carrying a full pot from the sink is like carrying a gas can from the station to your car every time you need fuel. A Pot Filler Brass is like having a private fuel pump right at your parking spot. It’s about direct-to-source efficiency.
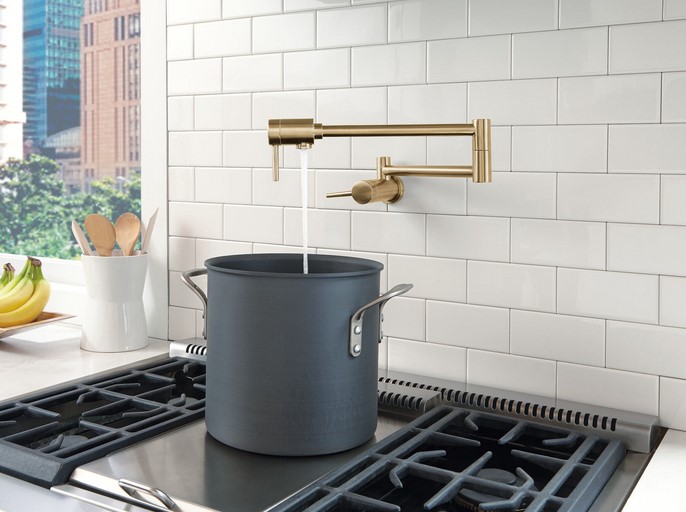
Technical Superiority: Why Brass is the Professional Standard
When you’re browsing the aisles of a home improvement center, you’ll see fixtures in stainless steel, plastic, and zinc alloys. But if you want a system that lasts as long as your mortgage, you choose brass.
1. Corrosion Resistance and Antimicrobial Properties
Brass is an alloy of copper and zinc. High-quality Pot Filler Brass units utilize “Lead-Free Brass” which is naturally resistant to the corrosive nature of tap water.
-
The Pro Insight: Brass has inherent antimicrobial properties. Since pot fillers often hold standing water in their long articulated arms between uses, the copper content in brass helps inhibit the growth of biofilm and bacteria.
2. High Flow Rates (GPM)
Unlike your standard kitchen faucet, which is often restricted for water conservation, a Pot Filler Brass is engineered for speed.
-
Most high-end units boast a 4.0 to 5.5 GPM (Gallons Per Minute) flow rate.
-
This means you can fill that massive pot in seconds, not minutes, keeping your prep time tight and your efficiency high.
3. Structural Integrity of Articulated Joints
A pot filler is a mechanical arm. It has multiple pivot points that experience high torque. Zinc or thin-walled steel will eventually develop “play” in the joints, leading to sagging and leaks. Solid brass is dense and rigid, ensuring that the arm stays perfectly level even after years of being swung back and forth.
Strategic Installation: The “Double Valve” Safety Protocol
For the intermediate DIYer or someone planning a renovation, installation height is the most debated topic. However, the most critical technical feature of a Pot Filler Brass is the dual-valve system.
Because these fixtures sit over expensive gas or induction ranges, a leak is a catastrophe. Professional-grade brass pot fillers feature two shut-off valves: one at the wall and one at the spout.
-
The Strategy: This “Double Block” ensures that if one valve fails or begins to drip, the second valve prevents water from damaging your high-end cooktop.
Expert Advice: The “Hidden” Technical Requirements
I’ve seen many homeowners buy a beautiful brass fixture only to realize their plumbing isn’t ready for it. Here is the insight you only get from being on-site:
-
Cold Water Only: Pot fillers are almost exclusively plumbed to a cold-water line. Do not try to run hot water through them; it can degrade certain internal seals not rated for high-temp standing water.
-
The “Clearance” Rule: Install the spout at least 3 to 4 inches higher than your tallest pot. If you mount it too low, you’ll be struggling to slide the pot under the arm; too high, and you’ll deal with excessive splashing.
-
Support the Stub-out: A brass pot filler is heavy. You must secure the 1/2-inch NPT pipe (the “stub-out”) to a 2×4 blocking inside the wall. If you just let it hang on the drywall, the weight of the brass arm will eventually cause a wall leak.
Tips Pro: Always flush your lines before the final installation. Construction debris like copper shavings or solder flux can ruin the ceramic disc cartridges inside your new Pot Filler Brass on day one.
Maintenance: Preserving the Brass Luster
Brass is beautiful, but it requires specific site maintenance to keep that “architectural” look.
-
Living Finishes vs. PVD: If you choose a “living finish” brass, it will develop a dark patina over time (which many love). If you want that bright gold shine forever, look for a PVD (Physical Vapor Deposition) finish. This is a technical coating that is virtually scratch-proof and won’t tarnish.
-
LSI Keywords: Ceramic disc cartridge, wall-mount flange, swing arm reach, dual jointed, lead-free waterway.
Scaling Efficiency: The ROI of a Specialized Fixture
You might ask, “Is a $300 to $600 fixture worth it?” From a Home Improvement Expert’s perspective, the answer is in the resale value and lifestyle scaling.
A Pot Filler Brass is a “high-perceived value” item. When potential buyers walk into your kitchen, it signals that the space was designed for serious cooking. It suggests a level of professional thought that a standard faucet simply cannot convey. It’s an investment in your home’s “culinary branding.”
Conclusion: Making the Pivot to Professionalism
Optimizing your culinary workflow is about removing friction. The Pot Filler Brass is the ultimate friction-remover. It eliminates the heavy lifting, adds a layer of technical sophistication to your plumbing, and brings a touch of timeless aesthetic to your stove-side.
Whether you are a beginner looking to add value to your first home or an intermediate renovator aiming for a chef-grade kitchen, the move to brass is a move toward longevity.
Have you ever had a “near-miss” carrying a heavy pot across the kitchen? Or are you currently planning a backsplash and wondering where to place your new filler? Let me know in the comments below—I’d love to help you get the measurements perfect for your space!