Source:https://www.deco-cretesupply.com
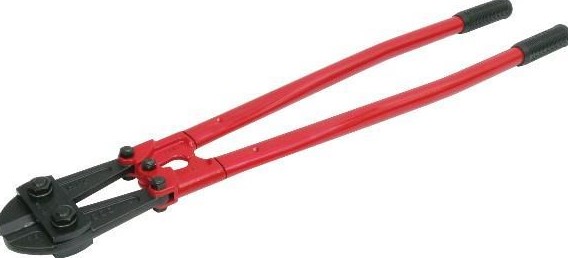
A few years ago, I was managing a fast-tracked commercial renovation on a tight deadline when a sub-contractor accidentally lost the keys to a master-hardened padlock securing our main rebar supply. We had a crew of ten guys standing around, costing us hundreds of dollars an hour in idle labor. One worker stepped up with a standard 14-inch tool, gave it a desperate squeeze, and completely chipped the jaws—the lock barely had a scratch. I walked over to my truck, grabbed my 42-inch industrial-grade bolt cutter heavy, and with one clean, satisfying snap, the site was back in motion.
In my 10+ years on active job sites and home improvement projects, I’ve learned that a tool is only as good as its physics. Many intermediate DIYers and site managers underestimate the sheer force required to slice through high-tensile metals.
When you are trying to scale your output on heavy-duty industrial cutting tasks, relying on underpowered equipment isn’t just frustrating; it destroys your efficiency and ruins your tools. Let’s dive deep into how upgrading to a legitimate heavy-duty cutting system can revolutionize your site productivity.
The Physics of Force: Why “Heavy” Changes Everything
Think of a standard pair of household scissors trying to cut through thick cardboard. No matter how hard you squeeze, the handles flex and the blades twist away from the material. Now, imagine a heavy-duty paper guillotine. It uses structural weight, an optimized pivot point, and rigid steel to slice effortlessly.
Upgrading to a bolt cutter heavy system operates on that exact same evolutionary leap in mechanical advantage. It is not just a larger version of a standard hand tool; it is a meticulously engineered force-multiplier.
When we talk about “scaling output” in industrial or major home renovation environments, we are talking about minimizing muscle fatigue and maximizing tool longevity. In my decade on the ground, I’ve seen that a properly balanced, heavy-duty cutter allows an operator to perform hundreds of high-tensile cuts a day without destroying their wrists or throwing out their back.
Decoding the Anatomy of Industrial-Grade Cutters
To the untrained eye, all cutting jaws look similar. But for those of us who live in the details of home and site improvement, the technical variations are massive. If you want to make an informed investment, you need to understand the structural anatomy of these heavy-duty monsters.
1. The Jaw Metallurgy (The Business End)
Standard cutters often use basic carbon steel jaws, which are perfectly fine for soft copper wires or chain-link fences. However, an industrial-strength bolt cutter heavy utilizes chrome-molybdenum (Cr-Mo) steel alloy or vanadium-infused jaws.
These metals undergo precise induction hardening, allowing them to bite through hardened steel shackle locks, concrete reinforcement mesh, and structural rods up to a Rockwell hardness of HRC 40 or higher without denting.
2. The Compound Joint Geometry
The magic behind these tools lies in their three-point compound hinges. This geometry converts a modest 50 pounds of manual squeezing force at the rubber grips into several thousand pounds of concentrated kinetic pressure directly at the cutting apex.
3. Edge Profiles: Clipper Cut vs. Center Cut
-
Center Cut Jaws: The bevels are ground equally on both sides of the blade, meeting exactly in the middle. This is the ultimate choice for a bolt cutter heavy because it provides the most balanced structural support when biting into round rods or bolts.
-
Clipper Jaws: These are flat on one side, allowing you to make flush cuts against a surface. They are excellent for trimming structural rivets but are slightly more prone to edge chipping under extreme loads.
+------------------------+---------------------------------+-----------------------------------+
| Feature                | Standard Light-Duty Cutters     | Industrial Bolt Cutter Heavy      |
+------------------------+---------------------------------+-----------------------------------+
| Blade Material         | Standard Carbon Steel           | Induction-Hardened Chrome-Moly    |
| Typical Overall Length | 12 to 24 Inches                 | 36 to 42 Inches                   |
| Maximum Material Limit | Soft copper, thin wire mesh     | Hardened alloy bolts, heavy rebar |
| Handle Construction    | Stamped sheet metal             | Drop-forged tubular steel/fiber   |
+------------------------+---------------------------------+-----------------------------------+
Strategic Operation: Maximizing Output Safely
Even with a top-tier tool, technique determines your efficiency. Over the years, I have trained dozens of apprentices, and the common mistake is always the same: trying to cut using brute force alone rather than letting the tool’s geometry do the heavy lifting.
Position the Material Deep in the Jaws
Never try to cut an alloy bolt using the tips of the blades. The cutting force drops exponentially the further away you get from the main pivot pin. Always slide the material as deep into the throat of the jaws as possible. This ensures maximum leverage and prevents the blades from twisting or sliding off.
Body Weight Over Muscle Power
If you are operating a 36-inch or 42-inch bolt cutter heavy, don’t just rely on your arm muscles to squeeze the handles closed. Instead, rest one handle firmly on a stable workbench or the concrete floor, place both hands on the top handle, and use your upper body weight to press down. This technique cuts your physical exertion in half.
The Shatter Zone
When high-tensile hardened steel bolts or spring steel wires finally give way under thousands of pounds of pressure, they don’t just snap—they release stored kinetic energy. Small fragments of metal can fly off at supersonic speeds. Never pull the handles without wearing high-impact rated Z87+ safety glasses. Additionally, warn anyone standing within a 10-foot radius to look away from your cutting zone.
Pro-Level Maintenance for Industrial Longevity
An industrial tool is a financial asset. If you treat it like junk, it will perform like junk. To ensure your investment continues to scale your output smoothly across years of heavy demolition or construction projects, adopt this expert maintenance checklist:
-
Adjust the Eccentric Bolts regularly: Look closely at the jaw plates of your heavy cutter; you will see adjustable eccentric cams. Over hundreds of cuts, the alignment can drift slightly, leaving a tiny gap between the blades. Use a wrench to adjust these cams so that the cutting edges kiss perfectly without overlapping when the handles are completely closed.
-
Lubricate the Pivot Points: The compound hinges handle extreme friction. Wipe down the joints after every project and apply a few drops of heavy-duty machine oil or lithium grease to keep the mechanical movement smooth.
-
Inspect for Micro-Fractures: Periodically check the blades under bright light. If you notice tiny spiderweb hairline cracks forming along the cutting edge, the steel has reached its fatigue limit and the jaw assembly needs to be replaced before it fails catastrophically on the job.
Scaling Your Workspace Productivity
At the end of the day, elevating your workflow from a beginner to an intermediate or expert level is about respecting the material you are working with. If your daily projects involve cutting through heavy-duty structural steel, chain links, or stubborn fasteners, struggling with sub-par hand tools is a massive drain on your time and energy. Upgrading to a professional-grade bolt cutter heavy streamlines your operations, keeps your project timelines on track, and gives you the raw mechanical confidence to conquer any site obstacle.
What’s In Your Tool Box?
Have you ever destroyed a pair of standard pliers or cheap cutters trying to tackle a stubborn lock or structural rod? What kind of materials are you preparing to cut for your next big home renovation or industrial project? Drop your stories, tool questions, or site challenges in the comments below—let’s maximize your cutting efficiency together!