Category: Contraction

Get Your DIY Skills Rolling with Backyard Bowling Alley Construction

Source : https://www.simplemost.com

Introduction

In a world inundated with digital entertainment and fast-paced activities, sometimes there’s a longing for the simpler joys of life. Building a backyard bowling alley offers a fantastic opportunity to tap into your DIY skills and create a space that promotes outdoor fun, social interaction, and a sense of accomplishment. Constructing your own backyard bowling alley may seem like a daunting task, but with careful planning, dedication, and a bit of elbow grease, you can transform your outdoor space into a hub of enjoyment for family and friends.

Planning Phase: Lay the Foundation

Every successful DIY project starts with meticulous planning. Before you embark on the journey of building a backyard bowling alley, consider the following factors:

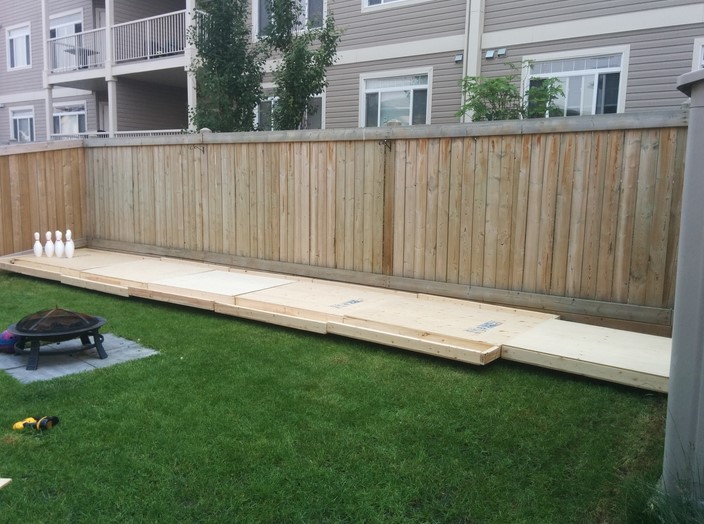
1. Space Allocation: Evaluate the available area in your backyard and determine where the bowling alley will fit best. Keep in mind that a regulation-size bowling lane is approximately 42 inches wide and 60 feet long. Adjust the dimensions according to the space you have.

2. Materials: Research the materials you’ll need, including wood for the lane, synthetic or wooden boards for the gutters, pins, and bowling balls. Opt for durable materials that can withstand outdoor elements.

3. Permits and Regulations: Check with your local authorities regarding necessary permits and regulations for constructing a recreational structure in your backyard. Adhering to local codes is crucial to avoid legal complications down the line.

4. Budget: Estimate the costs of materials, tools, and any professional assistance you might require. Create a budget that you’re comfortable with and try to stick to it as closely as possible.

Construction Phase: Rolling Up Your Sleeves

Once you have a solid plan in place, it’s time to roll up your sleeves and start constructing your backyard bowling alley. Here’s a step-by-step guide to help you through the process:

1. Clear the Area: Remove any obstacles, debris, or vegetation from the chosen area. Level the ground as much as possible to ensure a smooth playing surface.

2. Build the Foundation: Create a sturdy base for your bowling alley by laying down a foundation of gravel or crushed stone. This will provide proper drainage and prevent the alley from shifting over time.

3. Construct the Lane: Begin by building the lane itself. Use high-quality wood or synthetic materials for a smooth and even surface. Follow the dimensions carefully, ensuring the lane’s width and length are accurate.

4. Install Gutters: Attach gutters on either side of the lane to catch stray balls and guide them back to the player. These can be made from wood or synthetic materials and should be sloped slightly downward toward the player’s end.

5. Set Up the Pins: Place bowling pins at the end of the lane in a triangular formation. You can purchase official pins or create your own with wood. Ensure the pins are set up precisely according to regulation standards.

6. Add the Approach Area: Designate a section at the beginning of the lane as the approach area. This is where players will take their shots. Create a smooth and slip-resistant surface to prevent accidents.

7. Finishing Touches: Paint the lane and gutters with weather-resistant paint to protect the wood from the elements. Consider adding your personal touch by decorating the area around the alley with comfortable seating, lighting, and landscaping.

Maintenance and Enjoyment: Keeping the Fun Rolling

Congratulations, you’ve successfully built your own backyard bowling alley! However, the journey doesn’t end here. To ensure the longevity of your creation and the continuous enjoyment of all who play on it, consider the following maintenance tips:

1. Regular Cleaning: Keep the lane and gutters free from leaves, debris, and dirt. Regular sweeping and occasional power washing will help maintain a smooth playing surface.

2. Inspect for Wear and Tear: Periodically assess the condition of the lane, gutters, and pins. Replace any worn-out components to prevent accidents and maintain the quality of the bowling alley.

3. Weather Protection: If possible, invest in a cover or shelter for the bowling alley to protect it from rain, snow, and harsh sunlight. This will extend its lifespan and reduce the frequency of maintenance.

4. Organize Tournaments: Make the most of your backyard bowling alley by organizing friendly tournaments with family and friends. It’s a great way to create lasting memories and bring people together.

Conclusion

Embarking on the journey of building a DIY backyard bowling alley is not just about constructing a recreational space; it’s about embracing the satisfaction of creating something with your own hands. From the initial planning phase to the final roll of the ball, the process is a testament to your dedication and craftsmanship. As you watch your loved ones gather around, enjoying the fruits of your labor, you’ll realize that the effort you put into this project was truly a strike of genius. So, get your DIY skills rolling and let the strikes and spares begin in your very own backyard bowling haven.

Navigating the Construction Process: From Conception to Completion

Navigating the construction process can be a daunting task for anyone, from the novice to the experienced. It is a complex process that requires careful planning and execution. From conception to completion, there are many steps involved in the construction process. This guide will provide an overview of the process, from the initial planning stages to the final completion of the project. It will discuss the various stages of the process, the roles and responsibilities of the various parties involved, and the tools and resources available to help ensure a successful outcome. With this information, you will be better equipped to navigate the construction process and ensure that your project is completed on time and within budget.

How to Choose the Right Contractor for Your Construction Project

Choosing the right contractor for your construction project is an important decision that can have a significant impact on the success of the project. It is important to take the time to research and evaluate potential contractors to ensure that you select the best one for your needs. Here are some tips to help you choose the right contractor for your construction project.

1. Research Potential Contractors: Before selecting a contractor, it is important to research potential contractors to ensure that they have the necessary experience and qualifications to complete your project. Look for contractors who have experience in the type of project you are undertaking and check references to ensure that they have a good track record of completing projects on time and on budget.

2. Get Quotes: Once you have identified potential contractors, it is important to get quotes from each of them. This will help you compare the cost of the project and ensure that you are getting the best value for your money.

3. Check Licensing and Insurance: It is important to make sure that the contractor you select is properly licensed and insured. This will protect you in the event of any accidents or damages that may occur during the project.

4. Ask Questions: Before making a final decision, it is important to ask questions to ensure that you understand the scope of the project and the contractor’s expectations. Make sure that you are clear on the timeline, budget, and any other details that are important to the success of the project.

By following these tips, you can ensure that you select the right contractor for your construction project. Taking the time to research and evaluate potential contractors will help you make an informed decision and ensure that your project is completed on time and on budget.

Understanding the Different Phases of Construction: What to Expect at Each Step of the Process

Construction projects involve a series of distinct phases, each of which requires careful planning and execution. Understanding the different phases of construction is essential for ensuring that the project is completed on time and within budget. This article will provide an overview of the different phases of construction and what to expect at each step of the process.

The first phase of construction is the pre-construction phase. During this phase, the project team will develop a plan for the project, including a timeline, budget, and scope of work. The team will also identify any potential risks and develop strategies to mitigate them. Additionally, the team will obtain any necessary permits and approvals from local authorities.

The second phase of construction is the design phase. During this phase, the project team will develop detailed plans and specifications for the project. This includes selecting materials, determining the layout of the building, and specifying any special features. The team will also review the plans with the client to ensure that they meet their needs and expectations.

The third phase of construction is the construction phase. During this phase, the project team will begin to build the structure according to the plans and specifications. This includes laying the foundation, erecting the walls, and installing the roof. The team will also install any necessary utilities, such as plumbing and electrical systems.

The fourth phase of construction is the completion phase. During this phase, the project team will complete any remaining tasks, such as painting, landscaping, and installing fixtures. The team will also conduct a final inspection to ensure that the project meets all safety and quality standards.

By understanding the different phases of construction, you can ensure that your project is completed on time and within budget. Each phase of construction requires careful planning and execution, and it is important to be aware of what to expect at each step of the process.

Conclusion

Navigating the construction process from conception to completion is a complex and time-consuming endeavor. It requires careful planning, attention to detail, and a thorough understanding of the various stages of the process. With the right guidance and resources, however, it is possible to successfully complete a construction project on time and within budget. By following the steps outlined in this article, you can ensure that your project is completed to the highest standards and that you are able to enjoy the results of your hard work.

What You Should Know about Patrick Shin Lawsuit

From a small company with just one employee, Nan Inc. has now become a multimillion dollar business with more than 700 people working for it. There is a lot of hard work, dedication and effort that goes into establishing such a company and this is what Patrick Shin has done. He is the owner and founder of Nan Inc. and came to the United States from South Korea. He attended Bowling Green State University on a football scholarship where he majored in business administration.

Then, he moved to Hawaii where he worked in a construction firm for two years before setting up Nan Inc. in 1990. Three decades later, Nan Inc. has become the largest locally owned and operated company in all of Hawaii, with its office based in Honolulu. Patrick Shin himself is known in the state as a businessman as well as a generous philanthropist.

He worked tirelessly to give his company a boost. As mentioned earlier, when Patrick Shin launched Nan Inc., he only had one laborer, but he was adamant to do any and all work that came his way. Installing a road sign was the first project he undertook. Every single project was delivered with the same level of quality and transparency, which has helped Nan Inc. develop a strong reputation in the entire industry. It is the reason that they were able to get massive multibillion dollar projects and have already completed more than 3,500 of them.

It earned the honor of being Honolulu’s rail contactor and that’s how the whistleblower lawsuit came about. What you should know about Patrick Shin lawsuit is that it was filed in 2019 by a former employee of Nan Inc. who was fired. This was a wrongful termination lawsuit, where the ex-employee alleged that he was fired upon warning the company regarding their ‘illegal practices’. In July, a court ruled in favor of Nan Inc., which indicates that the company was in the right when they let him go.

The man had alleged that he had spoken to the company’s president, Patrick Shin and told to mind his own business, but no such thing had occurred. According to the founder, the outcome of the lawsuit is a validation for all employees of the construction firm and explains why it has had a positive reputation in the community for the last three decades and has continued to climb up the popularity ladder.

CHOOSE A FAVOURITE WOOD FOR DECK CONSTRUCTION.

When it is considered a hard – scape improvement, the material selection for your deck should be given some thought before going forward. This article explains the pros and cons of various popular wood types most often used in deck construction.

Redwood is a native tree grown throughout the northern and central California coast and along the western slopes of the Sierra Nevada Mountains in central and eastern California.

Considered a soft wood species, redwood is best known for its natural longevity and resistance to insects and decay. There colors range from light shades of pink, to ruddy deep red or brown, making redwood a beautiful wood for decking. On the sad side, as the wood is exposed to moisture, and sun, the colors fade and the wood takes on a brown and eventually a sliver gray tone overall. Once the wood is completely aged from exposure about three to four months, the general appearance is dark brown and will remain so far, a few years. However, eventually after some years, the wood turns to silver gray.

Cedar is another soft wood also grown on both coasts; it is a beautiful wood that will naturally age from a golden orange to brown to gray color. However, cedar is always easy scratched and can splinter. As a decking material is must be treated very carefully in order to maintain its good look. You may consider suing cedar for balustrades, and hand rails to complement a redwood deck, rather than the decking itself.

Another one is hardwood such as Pau Lope, also known as ironwood is an excellent choice for its structure integrity, good looks and a smooth splinter surface. However, the pau lope is difficult to work with and the oil dust it produces can be toxic, so hiring a professional deck builder with Pau Lope experience is a must.

If you are building your deck near fresh salt water, Pau Lope is an excellent choice because, unlike the redwood or cedar, Pau Lope will easily resist damage caused by moisture for as long as twenty plus years. Pau Lope is often used in commercial construction of decks, wharfs and boat docks for this reason. In case you want to build your deck, do not hesitate to contact Decking Central Coast professionals at – Decking Central Coast, Address: 3/8 Akora Road, Wyoming NSW 2250, Phone: 0240036404

Map:

LOG CABIN HOMES


What better way to blend with the environment than build a log cabin home? Log cabin homes come in various types and sizes all determined by your budget. In this article we will take you on a journey to better understand these types of homes.

Durability

The durability of log homes is to be admired. Some log homes in Russia have been around for 1000 years, and most log homes in Europe are dated 800 years. Clearly the durability of these homes is outstanding. It is a lifetime, or rather, a generational investment.

Construction Cost

The construction cost of log homes varies. The costs actually depend on the geographical location and the contractor you will hire. You would also want to put into account the construction materials. Durable construction would be slightly expensive but worthwhile. You will have to go with the notion that cheap is expensive to overlook the cost burden.

Aesthetic Value and going green

With the right contractor, the craftsmanship that would be put in your log home would be breathtaking. Your home would be constructed as per your preference and to blend in with nature. You would be building you dream home, and at the same time putting into account the environment around you.

What are the Cons?

Some of the cons of constructing log cabin homes include:

  • Insurance concerns – The remote location of these homes makes it hard to insure them.
  • Pests – Log homes are made out of wood, which are prone to pest attack if not well treated.
  • Maintenance costs – Every type of home requires maintenance and log homes are no exception.

To limit these cons and to build the best log cabin home as per your budget, I would suggest you reach out to East Texas custom home builders. It is time to create your dream home with the experts who would advise and guide you.

Map: