Month: August 2023

Creative Bed Edging Ideas for a Beautiful Garden

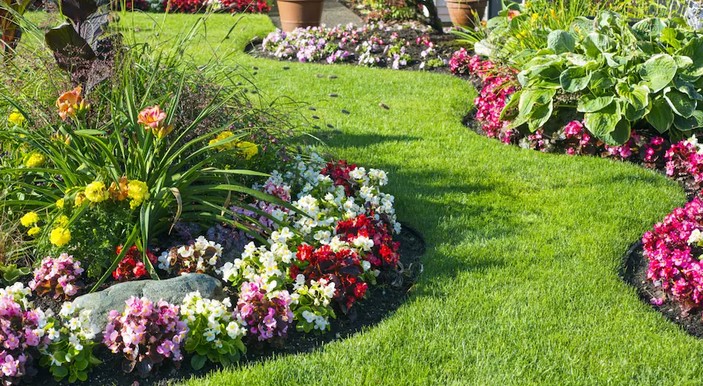
Bed edging is a fundamental landscaping technique that goes beyond aesthetics, offering a neat and organized border between different elements in your outdoor space. Whether it’s separating flower beds from lawns, defining pathways, or outlining garden features, proper bed edging not only enhances the visual appeal but also helps maintain the overall structure and cleanliness of your landscape.

Source : https://s3media.angieslist.com

A well-maintained garden is a true delight for any homeowner or gardening enthusiast. While colorful flowers and lush greenery play a significant role in creating an enchanting outdoor space, often it’s the details that make all the difference. One such detail that can elevate the aesthetics of your garden is bed edging. Bed edging not only provides a neat and organized appearance but also prevents the invasion of grass and weeds into your flower beds. If you’re looking to add a touch of creativity to your garden, here are some innovative bed edging ideas that can transform your outdoor space into a beautiful haven.

1. Natural Stone Borders:
Nothing exudes elegance quite like natural stone. Incorporating natural stone borders along your garden beds adds a timeless charm to the landscape. Whether you opt for large, rustic boulders or smooth, flat stones, they create a distinct boundary that complements the organic beauty of your plants. The irregular shapes and earthy hues of natural stones blend seamlessly with the surrounding vegetation, giving your garden a harmonious appeal.

2. Wooden Log Edging:
For a rustic and cozy atmosphere, consider using wooden logs as edging materials. Whether you choose weathered logs for a more aged look or fresh-cut logs for a cleaner appearance, this edging style imparts a warm and inviting feel to your garden. The varying heights and diameters of the logs can be arranged in a linear or staggered pattern, adding a touch of whimsy to your outdoor space.

3. Metallic Elegance:
Sleek and modern, metal edging creates a sharp contrast against the softness of plants and soil. Materials like steel, aluminum, or even wrought iron can be molded into various shapes and designs to suit your garden’s aesthetic. Metal edging is not only durable but also provides a clean separation between different sections of your garden. Its reflective surface can even enhance the play of light and shadow in your outdoor haven.

4. Brick Borders:
Classic and versatile, brick borders offer a traditional charm that fits well in both formal and casual garden designs. The warm tones of brick add a cozy feel to the landscape while providing a stable and long-lasting boundary for your beds. You can experiment with different patterns, such as herringbone or soldier course, to infuse your garden with personality.

5. Terracotta Pot Edging:
Repurposing terracotta pots as edging elements is an ingenious way to combine functionality with creativity. Line up these pots along your garden bed, leaving the opening facing outward. You can even plant small flowers or herbs within the pots for an extra burst of color and fragrance. This approach not only defines your garden space but also serves as a mini-container garden within the larger landscape.

6. Gabion Walls:
Gabions are wire cages filled with stones or pebbles. They offer a unique and industrial aesthetic that can be a bold statement in your garden. Gabion walls serve as both edging and retaining structures, making them an excellent choice for gardens with varying elevations. The contrast between the rugged stones and the soft vegetation creates a striking visual appeal.

7. Shell or Seaglass Borders:
If you’re looking to infuse a coastal or beachy vibe into your garden, consider using seashells or colorful seaglass as edging materials. These natural treasures can be arranged along your garden beds to create intricate patterns and mosaics. The play of light on the shells or glass pieces adds a whimsical and enchanting touch to your outdoor space.

8. Living Edges:
Living edges involve using plants themselves as a natural border for your garden beds. Low-growing plants like ornamental grasses, creeping thyme, or even cascading succulents can create a soft and seamless transition between your lawn and flower beds. This approach not only adds texture but also encourages a harmonious coexistence between different plant species.

9. Upcycled Edging:
Unleash your creativity by repurposing old items as garden bed edging. Items like vintage plates, salvaged tiles, or even discarded bicycle wheels can be strategically placed to form an eclectic and eye-catching border. This approach not only adds a touch of nostalgia but also promotes sustainable gardening practices.

In conclusion, bed edging is more than just a practical way to keep your garden organized—it’s an opportunity to express your creativity and enhance the visual appeal of your outdoor space. Whether you prefer the timeless elegance of natural stone, the warmth of wood, the sleekness of metal, or the uniqueness of upcycled materials, there’s an edging idea to suit every garden style. By choosing a bed edging style that resonates with your personal taste, you can transform your garden into a captivating sanctuary that reflects your passion for both nature and design.

Storage Solutions: How to Organize a Small Bedroom Closet

Source : https://www.ikea.com

A cluttered and disorganized bedroom closet can be a daily source of frustration. When you open the doors only to be met with a chaotic jumble of clothes, shoes, and miscellaneous items, it’s time to take action. The good news is that even if you have a small bedroom closet, there are plenty of effective storage solutions to help you transform it into an organized and functional space.

Plan Your Strategy

Before you dive into the organizing process, it’s essential to have a clear strategy in mind. Assess the available space in your small bedroom closet and consider how you want to utilize it. Make a list of the types of items you need to store – clothes, shoes, accessories, and any other miscellaneous items. This step will help you determine what storage solutions will work best for your specific needs.

Purge and Declutter

One of the most critical steps in organizing any space is decluttering. Begin by taking everything out of your closet. As you do this, ask yourself whether each item is something you use, need, or love. If the answer is no, it’s time to let go. Create piles for items you want to keep, donate, or discard. Be ruthless in your decision-making – the more you can let go of, the easier it will be to organize the remaining items.

Utilize Vertical Space

In a small bedroom closet, vertical space is your best friend. Install shelving units that reach up to the ceiling to maximize storage potential. This is an excellent way to store items like folded clothes, bags, and bins. You can also install hooks or pegs on the inside of the closet doors to hang accessories, such as belts, scarves, and hats. By utilizing the vertical space effectively, you free up valuable floor space for other storage solutions.

Invest in Smart Storage Solutions

There are numerous smart storage solutions designed specifically for small spaces. Consider using adjustable shelves that can be customized to accommodate different items. Pull-out baskets and bins are also great additions to a small closet, providing easy access to items while keeping them neatly contained. Shoe racks that hang from the closet rod or attach to the door can help free up floor space and keep your footwear organized.

Categorize and Group Items

As you start putting items back into your closet, categorize and group them. Keep similar items together – all your shirts in one section, pants in another, and so on. This not only makes it easier to find what you need but also helps you make the most of the available space. Consider using storage bins or baskets to further organize items within each category.

Use Clear Containers

When it comes to organizing small spaces, transparency can be your ally. Opt for clear containers and bins so you can easily see what’s inside without having to open each one. This is especially useful for items like accessories, craft supplies, or small miscellaneous items that can quickly become lost in the shuffle. Clear containers also give your closet a more streamlined and visually appealing look.

Rotate Seasonal Items

If your small bedroom closet is bursting at the seams, consider adopting a seasonal rotation strategy. As the seasons change, swap out your clothes and accessories to match the current weather. Store out-of-season items in under-bed storage boxes or in a separate storage area. This approach not only keeps your closet organized but also ensures that you’re only dealing with items relevant to the current season.

Maximize Door Space

Don’t overlook the potential of the back of the closet door. Install an over-the-door organizer with pockets or hooks to store a variety of items. This can include everything from shoes and handbags to jewelry and scarves. By making use of this often-unused space, you can free up even more room inside the closet itself.

Maintain Regularly

Organizing your small bedroom closet is not a one-time task. To keep it functional, you’ll need to establish a maintenance routine. Set aside a few minutes each week to tidy up, put away items that have strayed from their designated spots, and make sure everything is in order. This prevents clutter from building up again and makes the task of organizing feel less overwhelming.

Conclusion

Transforming a small bedroom closet from chaos to order is entirely achievable with the right storage solutions and a bit of determination. By planning your strategy, decluttering effectively, and using the available space wisely, you can create a closet that is not only organized but also tailored to your specific needs. Remember that organization is an ongoing process – regular maintenance will help you enjoy an organized closet for the long term. Say goodbye to the frustration of searching for items in a cluttered space and say hello to the satisfaction of a well-organized, functional closet.

Creative Closet Ideas for Small Bedrooms: Maximizing Space and Style

Introduction

In small bedrooms, optimizing space is key, and one often overlooked area with untapped potential is the closet. Clever closet ideas can transform these compact spaces into efficient storage solutions while adding a touch of organization and style to the room. Whether it’s maximizing vertical space or utilizing creative storage accessories, there’s an array of possibilities to make the most of your small bedroom’s closet space.

Source : https://storage.googleapis.com

In today’s urban living scenarios, where space is often a luxury, small bedrooms can present a unique challenge when it comes to storage solutions. The struggle to strike a balance between functionality and aesthetics can be especially daunting when designing a closet for a compact bedroom. However, with a dash of creativity and a sprinkle of ingenuity, small spaces can be transformed into stylish and efficient storage havens. This article dives into a plethora of creative closet ideas that promise to maximize space and style, turning cramped quarters into organized oases.

1. Utilize Vertical Space

When square footage is limited, the vertical space remains largely untapped. Exploit this often-overlooked dimension by installing floor-to-ceiling shelves or cabinets. Vertical storage not only optimizes space but also draws the eye upwards, creating an illusion of a larger room. Customizable modular shelving units can be tailored to fit snugly into any corner, accommodating clothes, shoes, and accessories with ease.

2. Sliding Doors for Space Efficiency

Traditional hinged closet doors can consume valuable floor area when opened. Opt for sliding doors to save space and provide a modern touch. Mirrored sliding doors serve a dual purpose, reflecting light and making the room appear more spacious. Alternatively, frosted glass panels can add an element of sophistication while maintaining privacy.

3. Open Shelving with Aesthetic Displays

Open shelving is an excellent way to merge storage with decor. Install a set of floating shelves and neatly arrange your clothing items, folded with precision or hung on stylish hooks. Intersperse these with decorative items like small potted plants, framed photos, or quirky artwork. This not only adds personality to your room but also keeps your essentials within easy reach.

4. Multifunctional Furniture

Furniture that serves multiple purposes is a treasure trove for small spaces. Choose a bed frame with built-in drawers or opt for an ottoman with hidden storage. A bench at the foot of the bed can double up as a storage unit while providing extra seating. This ingenious utilization of space ensures that no corner goes to waste.

5. Under-the-Bed Storage

The area under your bed is an often-underutilized goldmine for storage. Invest in bed risers to elevate the bed, creating enough room for sliding in bins or drawers. These can hold seasonal clothing, extra bedding, or even shoes, freeing up closet space for items that require hanging.

6. Corner Cabinets

Cornes are typically neglected spaces in a room. Transform these dead zones into functional wonders with corner cabinets. These can be custom-built or store-bought and provide a surprising amount of storage. Whether you need a spot for shoes, folded clothes, or accessories, corner cabinets can fit seamlessly into your room layout.

7. Pegboards for Accessories

Accessories often pose a challenge when it comes to organization. Installing a pegboard on the back of your closet door or an empty wall can be a game-changer. Add hooks and pegs to hang hats, bags, belts, and jewelry. This simple solution keeps your accessories visible and prevents them from getting tangled.

8. Color-coded and Minimalistic Approach

Adopting a color-coded approach to arranging your clothes not only brings an aesthetic appeal to your closet but also helps in quick retrieval. Hang clothes in a gradient from light to dark shades to create a visually pleasing effect. Embracing a minimalistic approach by keeping only the essentials can also make a small closet feel more spacious.

9. Mirror Illusion

Mirrors are renowned for their ability to create optical illusions. Place a full-length mirror on one wall of your closet to make the space appear larger. Additionally, mirrors reflect light, brightening up the room and adding a touch of glamour.

10. Curtain Closet

For an unconventional yet stylish approach, consider replacing closet doors with curtains. Choose a curtain that complements your bedroom’s color scheme and theme. Curtains provide easy access while adding a soft and breezy vibe to the room.

Conclusion

Designing an efficient and chic closet in a small bedroom demands creative thinking and a willingness to explore alternative storage solutions. From utilizing vertical space to embracing open shelving and multifunctional furniture, there’s a plethora of ideas to choose from. The key lies in combining space-saving techniques with aesthetic elements to create a harmonious blend of practicality and style. So, whether you’re working with a cozy apartment or a compact guest bedroom, these creative closet ideas can help you maximize the space while infusing your personal flair into the design.

Get Your DIY Skills Rolling with Backyard Bowling Alley Construction

Source : https://www.simplemost.com

Introduction

In a world inundated with digital entertainment and fast-paced activities, sometimes there’s a longing for the simpler joys of life. Building a backyard bowling alley offers a fantastic opportunity to tap into your DIY skills and create a space that promotes outdoor fun, social interaction, and a sense of accomplishment. Constructing your own backyard bowling alley may seem like a daunting task, but with careful planning, dedication, and a bit of elbow grease, you can transform your outdoor space into a hub of enjoyment for family and friends.

Planning Phase: Lay the Foundation

Every successful DIY project starts with meticulous planning. Before you embark on the journey of building a backyard bowling alley, consider the following factors:

1. Space Allocation: Evaluate the available area in your backyard and determine where the bowling alley will fit best. Keep in mind that a regulation-size bowling lane is approximately 42 inches wide and 60 feet long. Adjust the dimensions according to the space you have.

2. Materials: Research the materials you’ll need, including wood for the lane, synthetic or wooden boards for the gutters, pins, and bowling balls. Opt for durable materials that can withstand outdoor elements.

3. Permits and Regulations: Check with your local authorities regarding necessary permits and regulations for constructing a recreational structure in your backyard. Adhering to local codes is crucial to avoid legal complications down the line.

4. Budget: Estimate the costs of materials, tools, and any professional assistance you might require. Create a budget that you’re comfortable with and try to stick to it as closely as possible.

Construction Phase: Rolling Up Your Sleeves

Once you have a solid plan in place, it’s time to roll up your sleeves and start constructing your backyard bowling alley. Here’s a step-by-step guide to help you through the process:

1. Clear the Area: Remove any obstacles, debris, or vegetation from the chosen area. Level the ground as much as possible to ensure a smooth playing surface.

2. Build the Foundation: Create a sturdy base for your bowling alley by laying down a foundation of gravel or crushed stone. This will provide proper drainage and prevent the alley from shifting over time.

3. Construct the Lane: Begin by building the lane itself. Use high-quality wood or synthetic materials for a smooth and even surface. Follow the dimensions carefully, ensuring the lane’s width and length are accurate.

4. Install Gutters: Attach gutters on either side of the lane to catch stray balls and guide them back to the player. These can be made from wood or synthetic materials and should be sloped slightly downward toward the player’s end.

5. Set Up the Pins: Place bowling pins at the end of the lane in a triangular formation. You can purchase official pins or create your own with wood. Ensure the pins are set up precisely according to regulation standards.

6. Add the Approach Area: Designate a section at the beginning of the lane as the approach area. This is where players will take their shots. Create a smooth and slip-resistant surface to prevent accidents.

7. Finishing Touches: Paint the lane and gutters with weather-resistant paint to protect the wood from the elements. Consider adding your personal touch by decorating the area around the alley with comfortable seating, lighting, and landscaping.

Maintenance and Enjoyment: Keeping the Fun Rolling

Congratulations, you’ve successfully built your own backyard bowling alley! However, the journey doesn’t end here. To ensure the longevity of your creation and the continuous enjoyment of all who play on it, consider the following maintenance tips:

1. Regular Cleaning: Keep the lane and gutters free from leaves, debris, and dirt. Regular sweeping and occasional power washing will help maintain a smooth playing surface.

2. Inspect for Wear and Tear: Periodically assess the condition of the lane, gutters, and pins. Replace any worn-out components to prevent accidents and maintain the quality of the bowling alley.

3. Weather Protection: If possible, invest in a cover or shelter for the bowling alley to protect it from rain, snow, and harsh sunlight. This will extend its lifespan and reduce the frequency of maintenance.

4. Organize Tournaments: Make the most of your backyard bowling alley by organizing friendly tournaments with family and friends. It’s a great way to create lasting memories and bring people together.

Conclusion

Embarking on the journey of building a DIY backyard bowling alley is not just about constructing a recreational space; it’s about embracing the satisfaction of creating something with your own hands. From the initial planning phase to the final roll of the ball, the process is a testament to your dedication and craftsmanship. As you watch your loved ones gather around, enjoying the fruits of your labor, you’ll realize that the effort you put into this project was truly a strike of genius. So, get your DIY skills rolling and let the strikes and spares begin in your very own backyard bowling haven.

Turn your Backyard into a Bowling Alley: Here’s How

Gathered beneath the open sky, the backyard bowling alley transforms an ordinary outdoor space into a realm of joyous competition. The sound of rolling balls and triumphant cheers mingle with the rustling leaves, as friends and family take turns aiming for the pins amidst the backdrop of nature’s serenity. Here, strikes and spares intertwine with laughter, creating timeless memories in the heart of your own home.

Source : https://project.theownerbuildernetwork.co

When it comes to creating a fun and engaging outdoor space, the possibilities are endless. One unique and exciting idea is to transform your backyard into a personal bowling alley. Imagine the thrill of rolling a strike in the comfort of your own home, surrounded by nature and your loved ones. Converting your backyard into a bowling alley might seem like a daunting task, but with careful planning and the right approach, it can become a reality. In this article, we’ll guide you through the steps of turning your backyard into a bowling alley.

1. Assess Your Space

Before diving into the project, take a good look at your backyard. Consider the available space and its layout. Ideally, you’ll need a flat and level area for the bowling lane. Measure the dimensions to ensure that you have enough room for the length of the lane and the space required for players to comfortably roll the ball.

2. Plan the Layout

Once you’ve determined that your backyard has enough space, it’s time to plan the layout of your bowling alley. Decide on the direction in which you want the lane to run and mark the starting point and the pins’ location at the other end. Keep in mind that a standard bowling lane is about 60 feet long, so adjust the dimensions according to your available space.

3. Gather Materials

Creating a backyard bowling alley will require some materials. You’ll need:

– Synthetic bowling lane material or artificial turf for the lane
– Bowling pins and balls
– Wooden boards or barriers for the sides of the lane
– Measuring tape, stakes, and string for accurate markings
– Outdoor lighting for evening play
– Optional: seating area and decorative elements

4. Prepare the Lane

Clear the designated area and make sure the ground is level. If the ground isn’t even, you might need to do some digging and filling to create a smooth surface. Lay down the synthetic bowling lane material or artificial turf, securing it in place properly. This surface will provide the ideal conditions for rolling the ball smoothly.

5. Set Up the Bowling Pins

Arrange the bowling pins at the end of the lane, just like in a professional bowling alley. You can purchase a set of pins online or at a sports store. Ensure that the pins are set up in the traditional triangular formation, with the headpin positioned at the center.

6. Build the Lane Barriers

To prevent the ball from rolling off the lane, you’ll need to build barriers along the sides. Use wooden boards or any sturdy material that can withstand outdoor conditions. Attach the barriers securely to the ground on both sides of the lane. This step is crucial for keeping the game safe and contained within the designated area.

7. Mark the Foul Line

Similar to a real bowling alley, mark a foul line a few feet from the starting point. This line indicates where players should stand while rolling the ball. Use stakes and string to create a straight and accurate line. This ensures fair gameplay and adds an authentic touch to your backyard bowling experience.

8. Consider Lighting and Decor

If you plan to play in the evenings or at night, lighting is essential. Install outdoor lighting along the sides of the lane and near the pins so that players can see clearly. You can also add decorative elements, such as potted plants, colorful flags, or even a seating area for spectators to enjoy the game.

9. Invite Friends and Family

With your backyard bowling alley set up and ready to go, it’s time to invite friends and family over for a fun-filled day or evening of bowling. Organize a friendly tournament, complete with scorekeeping and prizes for the winners. Not only will this bring joy and laughter to your gatherings, but it will also create lasting memories for everyone involved.

10. Maintenance and Care

To ensure the longevity of your backyard bowling alley, proper maintenance is crucial. Regularly inspect the lane, barriers, and pins for any signs of wear and tear. Clean the synthetic lane material or artificial turf to prevent debris from affecting gameplay. If you experience any issues, address them promptly to keep the alley in top condition.

Conclusion

Turning your backyard into a bowling alley is a creative and exciting way to make the most of your outdoor space. With careful planning, the right materials, and a dash of creativity, you can create a personalized bowling experience right at home. Whether you’re a bowling enthusiast or simply looking for a unique way to entertain guests, a backyard bowling alley offers endless fun and enjoyment. So, roll up your sleeves, gather your supplies, and start transforming your backyard into a strikingly good time!