Category: Tools and Equipment

Standardized Fastening Logistics: Scaling Maintenance with the Machine Screw Kit

Source:https://images.thdstatic.com

A few months ago, I was called in to troubleshoot a failed HVAC installation at a commercial residential property. The main air handler unit was vibrating violently against its mounting bracket, producing an intolerable rattling noise throughout the second floor.

When I took off the access panel, the issue was immediately clear: the previous installer had forced a coarse-thread wood screw into a pre-tapped metric metal flange. He had stripped the internal threads completely, leaving the heavy motor housing held together by sheer luck and a prayer.

I spent twenty minutes re-tapping the stripped hole and pulling out a precise M6 stainless steel bolt from my organized machine screw kit. In under five minutes, the unit was bolted down solid as a rock, whisper-quiet, and fully restored.

Over my 10+ years in home improvement and mechanical contracting, I’ve seen thousands of dollars lost to stripped threads, mismatched fasteners, and wasted trips to the hardware store. Owning a well-curated machine screw kit isn’t just about collecting spare hardware—it is a foundational system for standardized repair, operational efficiency, and long-term structural reliability.

Machine Screws vs. Wood Screws: The Physics of Fastening

To understand why a dedicated machine screw kit is irreplaceable, you must understand how different fasteners transfer mechanical force.

Think of a standard wood screw or drywall screw like a wedge driven into a piece of wood. It cuts its own path, creating friction by displacing and compressing surrounding material.

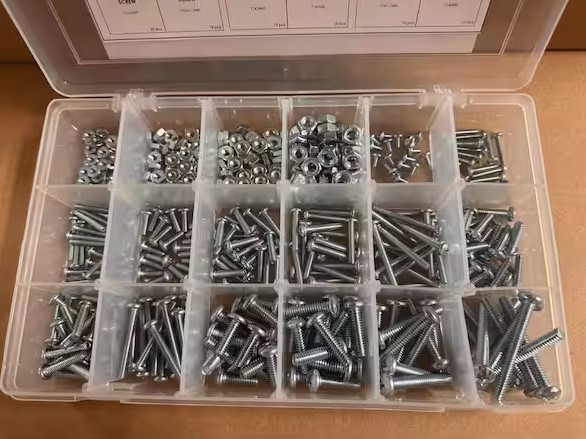
A machine screw, by contrast, behaves like a precision-engineered micro-vise. It does not cut its own hole. Instead, its uniform, parallel metal threads mesh smoothly into pre-tapped internal threads or pair with a matching hex nut. This creates uniform clamping force across the joined materials without deforming or weakening the substrate.

+--------------------------+-----------------------+-----------------------+-------------------------+
| Fastener Attribute       | Standard Wood Screw   | Sheet Metal Screw     | Machine Screw           |
+--------------------------+-----------------------+-----------------------+-------------------------+
| Thread Type              | Coarse, Tapered       | Sharp, Self-Tapping   | Fine/Coarse Parallel    |
| Required Mating Surface  | Raw Wood / Anchor     | Thin Metal Sheet      | Pre-Tapped Hole or Nut  |
| Primary Stress Bearing   | Material Shear / Friction| Material Friction  | High Clamping Force     |
| Reusability / Lifecycle  | Low (Wears Material)  | Moderate              | Infinite (Non-Stripping)|
+--------------------------+-----------------------+-----------------------+-------------------------+

Navigating Thread Standards: Imperial (SAE) vs. Metric Systems

The biggest headache DIYers and intermediate maintainers face is cross-threading mixed fasteners. A quality machine screw kit solves this by keeping thread standards strictly organized.

1. Imperial / Unified Thread Standard (UTS)

In North America, imperial machine screws are designated by gauge size, nominal diameter, and thread pitch (e.g., #8-32 x 1″ or 1/4″-20 x 1/2″):

  • #8: Specifies the diameter gauge size.

  • 32: Represents the thread count per inch (TPI).

  • 1″: Denotes the overall shank length under the screw head.

2. Metric System (ISO)

Metric fasteners use a simple, streamlined measurement system (e.g., M4-0.7 x 20mm):

  • M4: Indicates a 4mm nominal outer diameter.

  • 0.7: Measures the thread pitch—the actual distance in millimeters between adjacent thread peaks.

  • 20mm: Specifies the shank length in millimeters.

Anatomy of a Pro-Grade Machine Screw Kit

If you buy a cheap bin of unsorted screws, you will waste more time digging for hardware than fixing things. A high-efficiency machine screw kit must be structured around specific technical criteria.

Material Grade and Metallurgy

  • 304 / 316 Stainless Steel: Excellent corrosion resistance for outdoor fixtures, bathrooms, and plumbing repairs.

  • Grade 8 / Class 10.9 Alloy Steel: High tensile strength designed for heavy mechanical loads, structural brackets, and motor mounts.

  • Zinc-Plated Carbon Steel: Cost-effective indoor hardware suitable for appliances and electrical enclosures.

Essential Head Styles and Drives

A versatile kit should offer a mix of Pan Head (flat bottom for maximum surface contact), Countersunk Flat Head (flush seating), and Socket Cap (high-torque hex drive). Pair these with Phillips, Torx (Star), or Internal Hex drives to minimize cam-out risks.

Step-by-Step Protocol for Precision Fastening

Installing machine screws correctly ensures maximum clamping force and prevents stripped threads or frozen hardware down the road.

1.Identify the Internal Thread Pattern:Match pitch and diameter.

Use a mechanical thread pitch gauge or test nut from your machine screw kit to verify whether the receiving hole is Imperial (UNC/UNF) or Metric (ISO coarse/fine).

2.Hand-Start the Thread Engagement:Avoid cross-threading.

Always turn the machine screw by hand for the first 2 to 3 full revolutions. If you feel resistance immediately, stop! Back off and realign to avoid stripping the delicate internal threads.

3.Incorporate Lock Washers or Threadlocker:Prevent vibration loosening.

For assemblies exposed to active vibration (fans, pumps, appliances), slip a split lock washer under the bolt head or apply a drop of removable (blue) medium-strength liquid threadlocker.

4.Torque to Specification:Use calibrated force.

Tighten using the appropriate hand driver or torque wrench until firm. Avoid over-torquing smaller M3 or #6 fasteners, which can shear the bolt head right off the shank.


Expert Advice: Pro Tips and Hidden Traps

⚠️ Galvanic Corrosion Hazards

Never drive an unprotected carbon steel machine screw directly into an aluminum housing in damp or wet environments! Mixing dissimilar metals triggers galvanic corrosion, which fuses the screw permanently into the hole, seizing the threads. Always use stainless steel hardware with anti-seize lubricant when joining aluminum assemblies.

The Power of Matching Nuts and Flat Washers

A machine screw is only half of a fastening system. Always pair your screws with matching flat washers and nylon-insert lock nuts (Nyloc) from your kit. Flat washers distribute the clamping load evenly across fragile surfaces like plastic or sheet metal, while nylon lock nuts keep assemblies tightly bound without backing out over time.

💡 Pro Tip from the Field

Have a machine screw that is slightly too long for a blind hole? Thread a standard hex nut onto the screw shank first, cut the screw down to your desired length with a hacksaw or rotary tool, and then unscrew the nut. As the nut backs off the end, it automatically straightens and dresses the freshly cut metal threads!

Streamline Your Maintenance Operations Today

Standardizing your hardware inventory with a high-durability, well-organized machine screw kit is an essential milestone for any serious DIYer, home improver, or technician. By respecting thread pitch physics, using the correct metallurgy, and following precise torque protocols, you eliminate costly repair delays and ensure your household fixtures remain rock-solid for life.

How do you currently organize and manage your spare fasteners and hardware inventory? Have you ever dealt with the nightmare of a stripped thread on a critical home appliance or mechanical project? Drop a comment below with your questions or share your favorite shop organization hacks—I’d love to jump into the discussion!

Heavy-Duty Industrial Cutting: Scaling Output with the Bolt Cutter Heavy

Source:https://www.deco-cretesupply.com

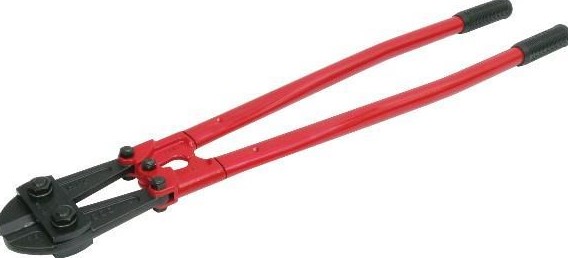
A few years ago, I was managing a fast-tracked commercial renovation on a tight deadline when a sub-contractor accidentally lost the keys to a master-hardened padlock securing our main rebar supply. We had a crew of ten guys standing around, costing us hundreds of dollars an hour in idle labor. One worker stepped up with a standard 14-inch tool, gave it a desperate squeeze, and completely chipped the jaws—the lock barely had a scratch. I walked over to my truck, grabbed my 42-inch industrial-grade bolt cutter heavy, and with one clean, satisfying snap, the site was back in motion.

In my 10+ years on active job sites and home improvement projects, I’ve learned that a tool is only as good as its physics. Many intermediate DIYers and site managers underestimate the sheer force required to slice through high-tensile metals.

When you are trying to scale your output on heavy-duty industrial cutting tasks, relying on underpowered equipment isn’t just frustrating; it destroys your efficiency and ruins your tools. Let’s dive deep into how upgrading to a legitimate heavy-duty cutting system can revolutionize your site productivity.

The Physics of Force: Why “Heavy” Changes Everything

Think of a standard pair of household scissors trying to cut through thick cardboard. No matter how hard you squeeze, the handles flex and the blades twist away from the material. Now, imagine a heavy-duty paper guillotine. It uses structural weight, an optimized pivot point, and rigid steel to slice effortlessly.

Upgrading to a bolt cutter heavy system operates on that exact same evolutionary leap in mechanical advantage. It is not just a larger version of a standard hand tool; it is a meticulously engineered force-multiplier.

When we talk about “scaling output” in industrial or major home renovation environments, we are talking about minimizing muscle fatigue and maximizing tool longevity. In my decade on the ground, I’ve seen that a properly balanced, heavy-duty cutter allows an operator to perform hundreds of high-tensile cuts a day without destroying their wrists or throwing out their back.

Decoding the Anatomy of Industrial-Grade Cutters

To the untrained eye, all cutting jaws look similar. But for those of us who live in the details of home and site improvement, the technical variations are massive. If you want to make an informed investment, you need to understand the structural anatomy of these heavy-duty monsters.

1. The Jaw Metallurgy (The Business End)

Standard cutters often use basic carbon steel jaws, which are perfectly fine for soft copper wires or chain-link fences. However, an industrial-strength bolt cutter heavy utilizes chrome-molybdenum (Cr-Mo) steel alloy or vanadium-infused jaws.

These metals undergo precise induction hardening, allowing them to bite through hardened steel shackle locks, concrete reinforcement mesh, and structural rods up to a Rockwell hardness of HRC 40 or higher without denting.

2. The Compound Joint Geometry

The magic behind these tools lies in their three-point compound hinges. This geometry converts a modest 50 pounds of manual squeezing force at the rubber grips into several thousand pounds of concentrated kinetic pressure directly at the cutting apex.

3. Edge Profiles: Clipper Cut vs. Center Cut

  • Center Cut Jaws: The bevels are ground equally on both sides of the blade, meeting exactly in the middle. This is the ultimate choice for a bolt cutter heavy because it provides the most balanced structural support when biting into round rods or bolts.

  • Clipper Jaws: These are flat on one side, allowing you to make flush cuts against a surface. They are excellent for trimming structural rivets but are slightly more prone to edge chipping under extreme loads.

+------------------------+---------------------------------+-----------------------------------+
| Feature                | Standard Light-Duty Cutters     | Industrial Bolt Cutter Heavy      |
+------------------------+---------------------------------+-----------------------------------+
| Blade Material         | Standard Carbon Steel           | Induction-Hardened Chrome-Moly    |
| Typical Overall Length | 12 to 24 Inches                 | 36 to 42 Inches                   |
| Maximum Material Limit | Soft copper, thin wire mesh     | Hardened alloy bolts, heavy rebar |
| Handle Construction    | Stamped sheet metal             | Drop-forged tubular steel/fiber   |
+------------------------+---------------------------------+-----------------------------------+

Strategic Operation: Maximizing Output Safely

Even with a top-tier tool, technique determines your efficiency. Over the years, I have trained dozens of apprentices, and the common mistake is always the same: trying to cut using brute force alone rather than letting the tool’s geometry do the heavy lifting.

Position the Material Deep in the Jaws

Never try to cut an alloy bolt using the tips of the blades. The cutting force drops exponentially the further away you get from the main pivot pin. Always slide the material as deep into the throat of the jaws as possible. This ensures maximum leverage and prevents the blades from twisting or sliding off.

Body Weight Over Muscle Power

If you are operating a 36-inch or 42-inch bolt cutter heavy, don’t just rely on your arm muscles to squeeze the handles closed. Instead, rest one handle firmly on a stable workbench or the concrete floor, place both hands on the top handle, and use your upper body weight to press down. This technique cuts your physical exertion in half.

The Shatter Zone

When high-tensile hardened steel bolts or spring steel wires finally give way under thousands of pounds of pressure, they don’t just snap—they release stored kinetic energy. Small fragments of metal can fly off at supersonic speeds. Never pull the handles without wearing high-impact rated Z87+ safety glasses. Additionally, warn anyone standing within a 10-foot radius to look away from your cutting zone.

Pro-Level Maintenance for Industrial Longevity

An industrial tool is a financial asset. If you treat it like junk, it will perform like junk. To ensure your investment continues to scale your output smoothly across years of heavy demolition or construction projects, adopt this expert maintenance checklist:

  • Adjust the Eccentric Bolts regularly: Look closely at the jaw plates of your heavy cutter; you will see adjustable eccentric cams. Over hundreds of cuts, the alignment can drift slightly, leaving a tiny gap between the blades. Use a wrench to adjust these cams so that the cutting edges kiss perfectly without overlapping when the handles are completely closed.

  • Lubricate the Pivot Points: The compound hinges handle extreme friction. Wipe down the joints after every project and apply a few drops of heavy-duty machine oil or lithium grease to keep the mechanical movement smooth.

  • Inspect for Micro-Fractures: Periodically check the blades under bright light. If you notice tiny spiderweb hairline cracks forming along the cutting edge, the steel has reached its fatigue limit and the jaw assembly needs to be replaced before it fails catastrophically on the job.

Scaling Your Workspace Productivity

At the end of the day, elevating your workflow from a beginner to an intermediate or expert level is about respecting the material you are working with. If your daily projects involve cutting through heavy-duty structural steel, chain links, or stubborn fasteners, struggling with sub-par hand tools is a massive drain on your time and energy. Upgrading to a professional-grade bolt cutter heavy streamlines your operations, keeps your project timelines on track, and gives you the raw mechanical confidence to conquer any site obstacle.

What’s In Your Tool Box?

Have you ever destroyed a pair of standard pliers or cheap cutters trying to tackle a stubborn lock or structural rod? What kind of materials are you preparing to cut for your next big home renovation or industrial project? Drop your stories, tool questions, or site challenges in the comments below—let’s maximize your cutting efficiency together!

Industrial Maintenance Versatility: Scaling Utility with the Adjustable Wrench Tool

Source:https://static.vecteezy.com

You are knee-deep in a flooded basement, the sound of rushing water echoing against the walls, and you realize the shut-off valve is a size you didn’t prepare for. You reach into your pocket, and instead of a heavy roll of twenty different wrenches, you pull out one single, gleaming piece of steel. With a flick of your thumb, the jaws slide shut against the nut, and the chaos stops. In that moment, you aren’t just holding a piece of metal; you are holding the “Swiss Army Knife” of the mechanical world.

In my twelve years of navigating high-pressure industrial repairs and delicate home renovations, I’ve learned that the Adjustable Wrench Tool is the ultimate equalizer. While purists might argue for a dedicated socket set, the reality of the field is that we rarely have the luxury of a perfect environment. Whether you are scaling a ladder to fix an HVAC unit or tightening a loose bolt on a bicycle, this tool is the bridge between a “stuck” problem and a “solved” project.

The Engineering of Adaptation: How the “Crescent” Works

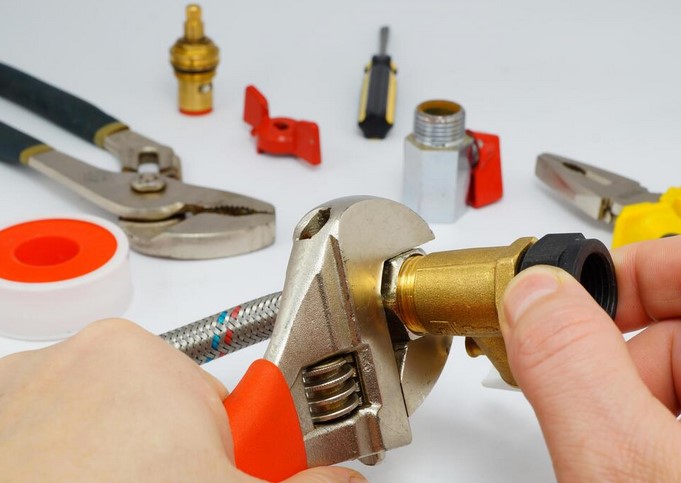
To the uninitiated, it looks simple: a handle, a fixed jaw, and a sliding jaw controlled by a worm screw. But from an engineering standpoint, an Adjustable Wrench Tool is a masterpiece of cantilevered force. It allows a user to exert massive amounts of torque on a fastener without needing a different tool for every millimeter of diameter change.

Think of it like a tailor-made suit versus a “one size fits all” robe. A standard wrench is the suit—perfect if it fits, useless if it doesn’t. The adjustable wrench is like a high-tech belt; it adapts to the “waistline” of the bolt instantly. This versatility is why, in my kit, the adjustable wrench occupies the most accessible pocket of my tool vest.

The Myth of “The Nut Rounder”

I often hear apprentices complain that adjustable wrenches “round off” bolt heads. My response is always the same: The tool didn’t fail; the operator did. In my decade of experience, I’ve found that 90% of rounded bolts come from improper jaw seating or using a low-quality tool with too much “play” in the mechanism. When used correctly, the Adjustable Wrench Tool is as precise as any fixed-head counterpart.

Deconstructing the Anatomy of a Professional Tool

When you are selecting an Adjustable Wrench Tool, you aren’t just buying a hunk of iron. You are investing in Metallurgical Integrity and Mechanical Tolerance.

1. Chrome Vanadium Steel Construction

Professional-grade wrenches aren’t made of simple carbon steel. We look for Chrome Vanadium (Cr-V). This alloy provides the high Tensile Strength required to prevent the jaws from “springing” or spreading under heavy load. If the jaws spread even half a millimeter, that’s when you lose your grip and bark your knuckles.

2. The Worm Gear and Rack Tolerance

This is where the “Expert Insight” comes in. Pick up a wrench and try to wiggle the sliding jaw with your fingers. If there is significant side-to-side movement, put it back. A high-end Adjustable Wrench Tool has a “tight” tolerance, meaning the jaw stays parallel to the fixed side throughout the entire torque cycle.

3. Laser-Etched Scales

Modern wrenches often feature SAE and Metric scales on the head. This isn’t just for show. It allows you to use the tool as a makeshift caliper to measure the diameter of a pipe or the size of a bolt you need to replace later.

Mastering the “Direction of Pull”: A Pro’s Secret

Here is a technical rule that separates the beginners from the intermediates: Always pull toward the moveable jaw side.

Imagine the wrench is like a person trying to lift a heavy box. If you pull in the wrong direction, all the pressure is placed on the small worm screw and the sliding track—the weakest parts of the tool. If you pull toward the fixed jaw (the solid part of the handle), the force is distributed across the thickest section of the steel.

Pro Tip: Look at the wrench. The side with the “movable” jaw should be facing you as you pull the handle toward your body. This ensures the structural spine of the tool takes the brunt of the force, not the internal gears.

Technical LSI Vocabulary for the Savvy Buyer

Before your next trip to the hardware store, familiarize yourself with these terms to ensure you’re getting industrial-grade utility:

  • Non-Protruding Jaw: A design where the sliding rail doesn’t stick out the back of the head when opened wide, allowing you to work in tighter spaces.

  • Black Phosphate Finish: Often preferred over chrome for industrial use because it provides a better grip when covered in oil and is highly resistant to corrosion.

  • Ergonomic Dipped Handle: A rubberized coating that reduces “hot spots” on your palm during high-torque applications.

  • Wide-Opening (Big Mouth): A specialized wrench that has a shorter handle but jaws that open wider than standard models—perfect for plumbing under a sink.

Hidden Warnings: The “Hammering” Temptation

We’ve all done it. You’re frustrated, a bolt won’t budge, and you reach for a hammer to strike the end of the wrench handle. Stop.

An Adjustable Wrench Tool is not an impact tool. Striking the handle with a hammer can shatter the internal worm gear or, worse, cause the tool to “kick back” and injure you. If a bolt is stuck, use a Penetrating Oil or a longer “cheater bar” to increase leverage, but never apply impact force to an adjustable mechanism.

Expert Advice: If you are working on “finished” surfaces—like a gold-plated bathroom faucet or a polished automotive part—place a thin piece of electrical tape or a rag inside the jaws of the wrench. This prevents the steel jaws from leaving “teeth marks” on the decorative finish.

Periodically check the “knurl” (the thumb screw). Over time, sawdust and metal shavings can get trapped in the threads. A drop of light machine oil or “3-in-1” oil once every few months will keep the action as smooth as glass.

Scaling Utility: The Three-Tool System

You don’t need fifty wrenches, but you do need three sizes of the Adjustable Wrench Tool to cover 95% of home and industrial maintenance:

  1. The 6-Inch “Pocket” Wrench: For small nuts, furniture assembly, and tight spaces.

  2. The 10-Inch “Workhorse”: This is your daily driver. It provides enough leverage for most plumbing and automotive tasks.

  3. The 15-Inch “Heavy Hitter”: Reserved for large water mains, hitch balls, and structural bolts.

Conclusion: The Anchor of Your Toolbox

The Adjustable Wrench Tool is more than just a convenience; it is a philosophy of readiness. It acknowledges that the world is messy and that fasteners don’t always come in the sizes we expect. By investing in a high-quality, Chrome Vanadium tool and mastering the “Direction of Pull,” you transform yourself from a frustrated tinkerer into a versatile maintainer.

Is there a specific bolt that has always given you trouble, or a “save of the day” where your adjustable wrench came to the rescue? I’ve seen these tools pull people out of some pretty tight spots. Drop a comment below with your favorite “toolbox essential,” and let’s talk shop about the gear that keeps our world turning!

Tools and Equipment Essentials: Empowering Your Home Improvement Projects

Tools and equipment are essential for any home improvement project. Whether you are a DIY enthusiast or a professional contractor, having the right tools and equipment can make all the difference in the success of your project. From power tools to hand tools, safety equipment to measuring tools, there are a variety of tools and equipment that can help you complete your project quickly and efficiently. With the right tools and equipment, you can empower yourself to tackle any home improvement project with confidence.

The Benefits of Investing in Quality Tools and Equipment for Home Improvement Projects

Investing in quality tools and equipment for home improvement projects is an important decision that can have a lasting impact on the success of the project. Quality tools and equipment can provide a number of benefits that can help to ensure that the project is completed safely, efficiently, and to the highest standards.

The first benefit of investing in quality tools and equipment is that they are designed to last. Quality tools and equipment are built to withstand the rigors of home improvement projects and are designed to last for many years. This means that you can be confident that the tools and equipment you purchase will be able to handle the job and will not need to be replaced in the near future. This can save you money in the long run, as you will not need to purchase new tools and equipment every time you undertake a home improvement project.

Another benefit of investing in quality tools and equipment is that they are designed to be safe and efficient. Quality tools and equipment are designed to be easy to use and to provide the best results. This means that you can be confident that the tools and equipment you purchase will be safe to use and will help to ensure that the project is completed quickly and efficiently. This can help to reduce the amount of time and effort that is required to complete the project, as well as reducing the risk of injury or damage to the property.

Finally, investing in quality tools and equipment can help to ensure that the project is completed to the highest standards. Quality tools and equipment are designed to provide the best results and are designed to meet the highest standards of safety and efficiency. This means that you can be confident that the project will be completed to the highest standards and that it will look great when it is finished.

In conclusion, investing in quality tools and equipment for home improvement projects is an important decision that can have a lasting impact on the success of the project. Quality tools and equipment can provide a number of benefits that can help to ensure that the project is completed safely, efficiently, and to the highest standards. Investing in quality tools and equipment can help to save money in the long run, as well as helping to ensure that the project is completed to the highest standards.

How to Choose the Right Tools and Equipment for Your Home Improvement Projects

Home improvement projects can be daunting, but with the right tools and equipment, they can be much easier to complete. Knowing which tools and equipment to use for each project is essential for success. Here are some tips to help you choose the right tools and equipment for your home improvement projects.

First, consider the scope of the project. Different projects require different tools and equipment. For example, if you are doing a simple repair job, you may only need a few basic tools, such as a hammer, screwdriver, and pliers. However, if you are doing a more complex project, such as installing a new kitchen, you will need more specialized tools and equipment.

Second, consider the quality of the tools and equipment. It is important to invest in quality tools and equipment that will last for many years. Cheap tools and equipment may seem like a good deal, but they are often of poor quality and may not last as long as more expensive tools and equipment.

Third, consider the safety of the tools and equipment. Make sure that the tools and equipment you choose are safe to use. Read the instructions carefully and follow all safety precautions.

Finally, consider the cost of the tools and equipment. Home improvement projects can be expensive, so it is important to shop around and compare prices. Look for deals and discounts to help you save money.

By following these tips, you can choose the right tools and equipment for your home improvement projects. With the right tools and equipment, you can complete your projects quickly and safely.

Conclusion

Tools and equipment essentials are essential for any home improvement project. They provide the necessary tools and equipment to complete the project safely and efficiently. With the right tools and equipment, you can make your home improvement projects easier and more successful. Investing in the right tools and equipment can save you time, money, and frustration. With the right tools and equipment, you can make your home improvement projects a success.