Category: Home Tips

Copper Craft: Designing a Penny Counter for a Unique Kitchen Feature

Source : https://i.pinimg.com

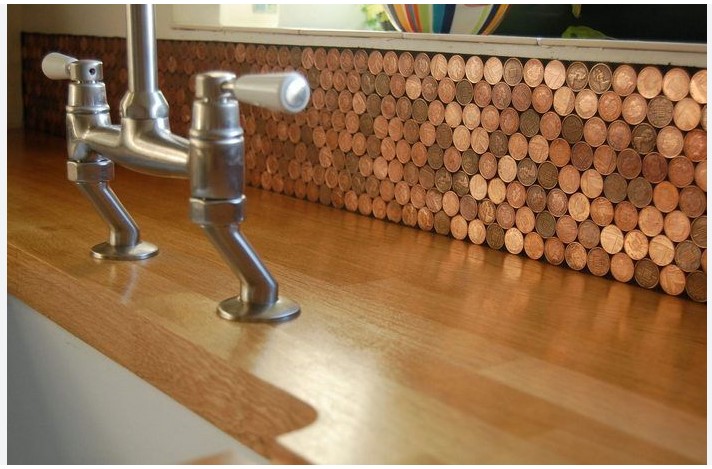
Copper Craft is a company that specializes in creating unique and stylish kitchen features. Their signature product is the penny counter, a unique countertop made from copper pennies. The penny counter is designed to be a beautiful and functional addition to any kitchen. It is a great way to add a unique touch to your kitchen while also providing a practical and useful surface. Copper Craft’s penny counter is made from high-quality copper pennies that are carefully arranged in a pattern to create a unique and eye-catching design. The penny counter is a great way to add a touch of style and sophistication to your kitchen.

How to Create a Stylish Penny Counter for Your Kitchen: Tips and Tricks for Crafting a Unique Copper Feature

Creating a stylish penny counter for your kitchen is a great way to add a unique copper feature to your home. Whether you’re looking to add a touch of rustic charm or a modern industrial feel, a penny counter can be the perfect addition to your kitchen. Here are some tips and tricks to help you craft a beautiful penny counter for your kitchen.

First, you’ll need to decide on the size and shape of your penny counter. Measure the area where you plan to install the counter and determine the size and shape that will best fit the space. You can also choose to create a custom shape to fit the area.

Next, you’ll need to gather the materials for your penny counter. You’ll need copper pennies, a sealant, a sealant applicator, a saw, and a drill. You’ll also need a level, a measuring tape, and a hammer.

Once you have all the materials, you’ll need to prepare the area where you plan to install the penny counter. Make sure the area is clean and free of debris. Then, use the measuring tape and level to mark the area where you plan to install the counter.

Now it’s time to start laying out the pennies. Begin by laying out the pennies in the shape of your counter. Make sure the pennies are evenly spaced and that the edges are flush. Once you’ve laid out the pennies, use the saw to cut the pennies to the desired size.

Once the pennies are cut, use the drill to make holes in the pennies. This will allow you to attach the pennies to the counter. Use the hammer to tap the pennies into place.

Finally, use the sealant and sealant applicator to seal the pennies. This will help protect the pennies from moisture and ensure that your penny counter will last for years to come.

Creating a stylish penny counter for your kitchen is a great way to add a unique copper feature to your home. With these tips and tricks, you can craft a beautiful penny counter that will be the perfect addition to your kitchen.

Copper Craft: Exploring the Benefits of Using Copper for Your Penny Counter Design

Copper is a popular choice for penny counter designs due to its many benefits. Copper is a durable and malleable metal, making it an ideal material for crafting penny counters. It is also resistant to corrosion, making it a great choice for long-term use. Copper is also a great conductor of electricity, making it a great choice for penny counters that require electrical components.

The malleability of copper makes it easy to shape and form into intricate designs. This makes it a great choice for penny counters that require intricate details. Copper can also be easily polished to a high shine, giving penny counters a beautiful and eye-catching finish.

Copper is also a great choice for penny counters due to its affordability. Copper is a relatively inexpensive metal, making it a great choice for penny counters that are on a budget. Copper is also easy to find, making it a great choice for penny counters that need to be made quickly.

Finally, copper is a great choice for penny counters due to its antimicrobial properties. Copper has been shown to have antimicrobial properties, making it a great choice for penny counters that will be used in areas with high levels of bacteria. This makes copper a great choice for penny counters that will be used in areas such as hospitals and restaurants.

In conclusion, copper is a great choice for penny counter designs due to its many benefits. Copper is a durable and malleable metal, making it an ideal material for crafting penny counters. It is also resistant to corrosion, making it a great choice for long-term use. Copper is also a great conductor of electricity, making it a great choice for penny counters that require electrical components. Copper is also an affordable and easy to find metal, making it a great choice for penny counters that are on a budget. Finally, copper has antimicrobial properties, making it a great choice for penny counters that will be used in areas with high levels of bacteria.

Conclusion

Copper Craft’s penny counter is a great way to add a unique and stylish touch to any kitchen. It is easy to install and provides a great way to keep track of your coins. The penny counter is a great way to add a touch of style and sophistication to any kitchen. With its unique design and easy installation, it is sure to be a great addition to any kitchen.

Fall Creations: Crafting Delightful Fall Crafts for Adults

Source : https://hips.hearstapps.com

Welcome to Fall Creations! Here, we specialize in crafting delightful fall crafts for adults. Whether you’re looking for a fun way to decorate your home for the season or a unique gift for a friend, we have something for everyone. Our crafts are designed to be easy to make and enjoyable to create. We use only the highest quality materials and our projects are sure to bring a smile to your face. So, grab your supplies and get ready to craft some delightful fall creations!

Get Creative with Fall Crafts: Ideas for Adults to Enjoy the Season

As the days grow shorter and the temperatures drop, it’s time to start thinking about ways to enjoy the fall season. Crafting is a great way to get creative and make something special to commemorate the season. Here are some ideas for adults to get creative with fall crafts.

1. Decorative Gourds: Gourds are a classic fall decoration, and they can be used to make a variety of crafts. Try painting them with fall colors, or use them to make a festive centerpiece.

2. Wreaths: Wreaths are a great way to add a touch of fall to your home. Try making a wreath out of dried leaves, pinecones, and other natural materials.

3. Candles: Candles are a great way to add a cozy atmosphere to any room. Try making your own candles with fall-scented essential oils, or use fall-themed molds to make unique shapes.

4. Fall-Themed Art: Get creative with fall-themed art. Try painting a landscape with fall colors, or make a collage of fall leaves.

5. Fall-Themed Jewelry: Jewelry is a great way to show off your style. Try making your own fall-themed jewelry with beads, charms, and other materials.

6. Fall-Themed Decorations: Decorations are a great way to add a festive touch to any room. Try making your own fall-themed decorations with paper, fabric, and other materials.

7. Fall-Themed Gifts: Gifts are a great way to show someone you care. Try making your own fall-themed gifts with homemade items such as candles, jewelry, and decorations.

These are just a few ideas for adults to get creative with fall crafts. With a little creativity and some basic supplies, you can make something special to commemorate the season.

Crafting with Nature: How to Make Fall-Themed Decorations with Natural Materials

As the days grow shorter and the leaves begin to change, it’s time to start thinking about how to decorate your home for the fall season. With a little creativity and some natural materials, you can create beautiful decorations that will bring the beauty of the outdoors into your home. Here are some ideas for crafting with nature to make fall-themed decorations.

One of the simplest ways to decorate for fall is to gather leaves and press them between two pieces of wax paper. Once the leaves are pressed, you can use them to make cards, bookmarks, or even framed artwork. You can also use the leaves to make a wreath for your front door. Simply gather a bundle of leaves and tie them together with a piece of twine or ribbon.

Another great way to decorate for fall is to make a garland of acorns. Gather a handful of acorns and string them together with a piece of twine or ribbon. Hang the garland on your mantel or around a doorway for a festive touch.

If you’re looking for a more permanent decoration, you can make a fall-themed centerpiece using pinecones, acorns, and other natural materials. Start by gathering a variety of pinecones, acorns, and other natural materials. Arrange them in a bowl or basket and add a few candles for a warm, inviting glow.

Finally, you can make a fall-themed wreath for your front door. Start by gathering a bundle of twigs and tying them together with a piece of twine or ribbon. Then, add pinecones, acorns, and other natural materials to the wreath. Hang the wreath on your front door for a festive touch.

With a little creativity and some natural materials, you can create beautiful decorations that will bring the beauty of the outdoors into your home. Crafting with nature is a great way to get into the spirit of the season and make your home look and feel cozy and inviting.

Conclusion

Fall Creations is a great way to get creative and have fun while crafting delightful fall crafts for adults. With a variety of projects to choose from, there is something for everyone. Whether you are looking for a fun way to decorate your home or a unique gift for a friend, Fall Creations has something for you. With easy-to-follow instructions and materials that are easy to find, you can create beautiful and unique crafts that will bring joy to your home and to those around you.

Fireside Marvel: Creating Built-In Shelves around Fireplaces

Source : google.com

Fireside Marvel is a company that specializes in creating custom built-in shelves around fireplaces. With over 20 years of experience, Fireside Marvel has become a leader in the industry, providing customers with high-quality, custom-built shelves that are designed to fit any fireplace. Whether you are looking for a traditional or modern look, Fireside Marvel has the perfect solution for you. From custom shelving to mantels and surrounds, Fireside Marvel has the perfect solution for any fireplace. With their attention to detail and commitment to customer satisfaction, Fireside Marvel is the perfect choice for anyone looking to add a unique touch to their home.

How to Design and Install Built-In Shelves Around Your Fireplace for a Cozy Fireside Marvel

Installing built-in shelves around your fireplace can create a cozy and inviting atmosphere in your home. Not only do they provide a place to store books, magazines, and other items, but they also add a touch of style and sophistication to your living space. With the right materials and tools, you can easily design and install built-in shelves around your fireplace in just a few steps.

Materials Needed

Before you begin, you will need to gather the necessary materials. This includes:

• Plywood

• Wood screws

• Wood glue

• Sandpaper

• Paint or stain

• Measuring tape

• Level

• Saw

• Drill

• Hammer

• Nails

Designing the Shelves

Once you have all the materials, you can begin designing the shelves. Start by measuring the area around the fireplace and sketching out a design for the shelves. Make sure to leave enough space for the mantel and any other decorations you may want to add. Once you have a design, you can begin cutting the plywood to the desired size and shape.

Installing the Shelves

Once the shelves are cut, you can begin installing them. Start by attaching the shelves to the wall using wood screws and wood glue. Make sure to use a level to ensure the shelves are even. Once the shelves are attached, you can sand them down and apply paint or stain to give them a finished look.

Adding the Finishing Touches

Once the shelves are installed, you can add the finishing touches. This includes adding a mantel and any other decorations you may want to include. You can also add nails to the shelves to hang pictures or other items.

With the right materials and tools, you can easily design and install built-in shelves around your fireplace. Not only will they provide a place to store books and other items, but they will also add a touch of style and sophistication to your living space.

Maximizing Space and Style with Built-In Shelves Around Your Fireplace for a Fireside Marvel

The fireplace is often the focal point of a room, and built-in shelves around it can add a touch of style and sophistication. Not only do they provide a place to store books, magazines, and other items, but they also create a cozy atmosphere for gathering around the fire. With a few simple steps, you can maximize the space and style of your fireplace with built-in shelves.

First, measure the area around your fireplace to determine the size and shape of the shelves. Consider the height of the shelves and the depth of the shelves to ensure they will fit in the space. You may also want to consider the material of the shelves, such as wood, metal, or glass.

Next, decide on the design of the shelves. You can choose from a variety of styles, such as open shelves, closed shelves, or a combination of both. Consider the items you plan to store on the shelves and the overall look you want to achieve.

Once you have determined the size and design of the shelves, it’s time to install them. If you are installing the shelves yourself, make sure to follow the manufacturer’s instructions carefully. If you are hiring a professional, make sure to discuss the installation process and any potential issues that may arise.

Finally, accessorize your shelves with items that will enhance the look of your fireplace. Consider adding books, candles, vases, or other decorative items to create a warm and inviting atmosphere.

By following these steps, you can maximize the space and style of your fireplace with built-in shelves. With a few simple touches, you can create a fireside marvel that will be the envy of all your guests.

Conclusion

Fireside Marvel has provided an innovative and cost-effective solution to creating built-in shelves around fireplaces. Their products are easy to install and provide a beautiful and functional addition to any home. With their wide selection of styles and finishes, there is sure to be a perfect fit for any home. Fireside Marvel is the perfect choice for anyone looking to add a unique and stylish touch to their fireplace.

Misty Gray Magic: Discovering the Charm of Benjamin Moore Smoke

Source : https://cdn.apartmenttherapy.info

Misty Gray Magic: Discovering the Charm of benjamin moore smoke is a book that explores the beauty and versatility of Benjamin Moore’s Smoke paint color. This book is perfect for anyone looking to add a touch of sophistication and elegance to their home. It provides detailed information on the color, its history, and how to use it in various interior design projects. It also includes inspiring photos and helpful tips for creating a beautiful and inviting space with Smoke. Whether you’re a beginner or a professional, this book will help you discover the charm of benjamin moore smoke.

How to Use Benjamin Moore Smoke to Create a Magical Atmosphere in Your Home

Creating a magical atmosphere in your home can be achieved with the use of benjamin moore smoke. This versatile paint color is a deep, smoky gray that can be used to create a cozy and inviting atmosphere. Whether you are looking to create a romantic ambiance or a calming retreat, benjamin moore smoke can help you achieve the desired effect.

When using benjamin moore smoke, it is important to consider the other colors in the room. To create a romantic atmosphere, pair benjamin moore smoke with warm colors such as reds, oranges, and yellows. These colors will create a cozy and inviting atmosphere that is perfect for a romantic evening. For a calming retreat, pair benjamin moore smoke with cool colors such as blues and greens. These colors will create a tranquil and peaceful atmosphere that is perfect for relaxation.

When painting with benjamin moore smoke, it is important to use the right tools. A high-quality paintbrush and roller are essential for achieving a smooth and even finish. It is also important to use a primer before painting with benjamin moore smoke to ensure that the color will adhere properly to the surface.

Once the painting is complete, it is important to accessorize the room to create the desired atmosphere. For a romantic atmosphere, add candles, soft lighting, and cozy blankets. For a calming retreat, add plants, comfortable furniture, and soothing music.

By using benjamin moore smoke and the right accessories, you can create a magical atmosphere in your home. Whether you are looking to create a romantic ambiance or a calming retreat, benjamin moore smoke can help you achieve the desired effect.

Exploring the Mystical Properties of Benjamin Moore Smoke: A Guide to Decorating with Misty Gray Magic

The mysterious and captivating hue of benjamin moore smoke is a timeless classic that has been used to create a variety of stunning interior designs. This misty gray color has a unique ability to evoke a sense of calm and serenity, making it an ideal choice for creating a tranquil atmosphere in any home.

When decorating with benjamin moore smoke, it is important to consider the various ways in which this color can be used to create a unique and inviting space. This guide will provide an overview of the mystical properties of benjamin moore smoke and offer tips on how to incorporate this color into your home décor.

The first step in decorating with benjamin moore smoke is to consider the color’s unique ability to create a sense of calm and serenity. This color has a subtle, yet powerful effect on the atmosphere of a room, making it an ideal choice for creating a tranquil and peaceful environment. To maximize the calming effect of this color, it is best to use it in combination with other muted tones such as beige, cream, and light gray.

In addition to its calming properties, benjamin moore smoke also has the ability to create a sense of depth and dimension in a room. This color can be used to create a cozy and inviting atmosphere by adding a touch of warmth to a space. To achieve this effect, it is best to pair benjamin moore smoke with warmer colors such as brown, orange, and yellow.

Finally, benjamin moore smoke can be used to create a sense of mystery and intrigue in a room. This color has a unique ability to evoke a sense of mystery and wonder, making it an ideal choice for creating a space that is both inviting and mysterious. To maximize the mysterious effect of this color, it is best to pair it with darker colors such as navy blue, black, and deep purple.

By considering the various ways in which benjamin moore smoke can be used to create a unique and inviting atmosphere, you can create a space that is both calming and mysterious. With its unique ability to evoke a sense of serenity and mystery, benjamin moore smoke is an ideal choice for creating a tranquil and inviting atmosphere in any home.

Conclusion

Misty Gray Magic: Discovering the Charm of benjamin moore smoke is a great resource for anyone looking to add a touch of sophistication and elegance to their home. The book provides detailed information on the color, its history, and how to use it in various design styles. It also offers helpful tips and tricks for achieving the perfect look. With its comprehensive coverage of the color, Misty Gray Magic is an invaluable resource for anyone looking to add a touch of sophistication and elegance to their home.

Beauty at Your Fingertips: Creating a Makeup Magnet Board

Welcome to Beauty at Your Fingertips: Creating a makeup magnet board! This guide will show you how to create a makeup magnet board that will make it easy to store and organize your makeup products. With this board, you’ll be able to quickly find the products you need and keep your makeup collection neat and tidy. You’ll also be able to customize the board to fit your own personal style. So let’s get started and create a makeup magnet board that will make your beauty routine easier and more enjoyable!

How to Create a Makeup Magnet Board: A Step-by-Step Guide to Beauty at Your Fingertips

Creating a makeup magnet board is a great way to keep your beauty products organized and easily accessible. With a few simple steps, you can have a beautiful and functional makeup magnet board that will make your beauty routine easier and more enjoyable.

Step 1: Gather Your Supplies

Before you begin, you will need to gather the necessary supplies. You will need a magnetic board, magnets, and any makeup products you want to store on the board. You can find magnetic boards in a variety of sizes and styles at most home improvement stores. Magnets can be purchased at craft stores or online.

Step 2: Prepare the Board

Once you have all of your supplies, you will need to prepare the board. Start by wiping down the board with a damp cloth to remove any dust or dirt. Then, use a ruler to measure and mark where you want to place the magnets.

Step 3: Attach the Magnets

Next, attach the magnets to the board. Make sure to place them in the spots you marked in the previous step. You can use a hot glue gun or double-sided tape to secure the magnets in place.

Step 4: Arrange Your Makeup

Now it’s time to arrange your makeup on the board. Place the items you use most often in the most accessible spots. You can also use the magnets to hang up any brushes or other tools you use for your beauty routine.

Step 5: Enjoy Your New makeup magnet board

Once you have finished arranging your makeup, you can enjoy your new makeup magnet board. It will make your beauty routine easier and more enjoyable. Plus, it will look great in your bathroom or bedroom.

Creating a makeup magnet board is a great way to keep your beauty products organized and easily accessible. With a few simple steps, you can have a beautiful and functional makeup magnet board that will make your beauty routine easier and more enjoyable.

The Benefits of Having a Makeup Magnet Board: Easily Accessible Beauty Products for On-the-Go Glamour

Having a makeup magnet board is a great way to keep your beauty products organized and easily accessible. This type of board is perfect for those who are always on the go and need to quickly get ready for any occasion. With a makeup magnet board, you can easily store and access your favorite beauty products without having to rummage through drawers or bags.

A makeup magnet board is a great way to keep your beauty products organized and easily accessible. This type of board is perfect for those who are always on the go and need to quickly get ready for any occasion. With a makeup magnet board, you can easily store and access your favorite beauty products without having to rummage through drawers or bags.

The makeup magnet board is a great way to keep your beauty products organized and easily accessible. This type of board is perfect for those who are always on the go and need to quickly get ready for any occasion. The board is designed with strong magnets that securely hold your beauty products in place. This allows you to quickly grab what you need without having to search through drawers or bags.

The makeup magnet board also helps to keep your beauty products organized. You can easily arrange your products in an organized manner, making it easier to find what you need. This also helps to keep your products from becoming cluttered and messy.

Having a makeup magnet board is a great way to keep your beauty products organized and easily accessible. This type of board is perfect for those who are always on the go and need to quickly get ready for any occasion. With a makeup magnet board, you can easily store and access your favorite beauty products without having to rummage through drawers or bags. This allows you to quickly grab what you need and get ready for any occasion.

Conclusion

In conclusion, creating a makeup magnet board is a great way to keep your makeup organized and easily accessible. It is a fun and creative way to store your makeup and can be customized to fit your individual needs. With a few simple supplies, you can create a beautiful and functional makeup magnet board that will make your makeup routine easier and more enjoyable.