
Source:https://i.ytimg.com
You’re deep in the second cycle of REM sleep at 2:00 AM when a faint crunch of gravel echoes from the bottom of your 100-foot driveway. By the time your dog barks or your porch light flickers on, the intruder—or the porch pirate—is already at your front door. In the security world, we call this a “reactive failure.” You’re responding to a threat that has already breached your inner sanctum.
In my decade of hardening home perimeters and installing smart security systems, I’ve learned that the most critical asset isn’t a high-definition camera—it’s time. I once worked with a homeowner who had $5,000 worth of 4K cameras but still lost his catalytic converter because he didn’t know the thieves were on his property until he saw the footage the next morning. That’s why I always recommend a Solar Driveway Alarm as the first line of defense. It turns your perimeter from a passive boundary into an active, real-time lookout.
The First Line of Defense: Understanding Perimeter Hardening
When we talk about “hardening” a perimeter, we’re looking to move the detection point as far away from your front door as possible. Most people focus on the house itself, but professional security starts at the edge of the property.
Think of your home security like an onion. Your front door lock is the core, your window sensors are the middle layers, and the Solar Driveway Alarm is the outer skin. If you can detect a “pressure” on that outer skin, you gain the 30 to 60 seconds of lead time needed to turn on lights, check a monitor, or call the authorities.
Installing a solar-powered system specifically solves the two biggest headaches I’ve faced in the field: wiring logistics and battery anxiety. There is nothing worse than a security device that dies right when you need it because you forgot to change a 9-volt battery in the middle of winter.
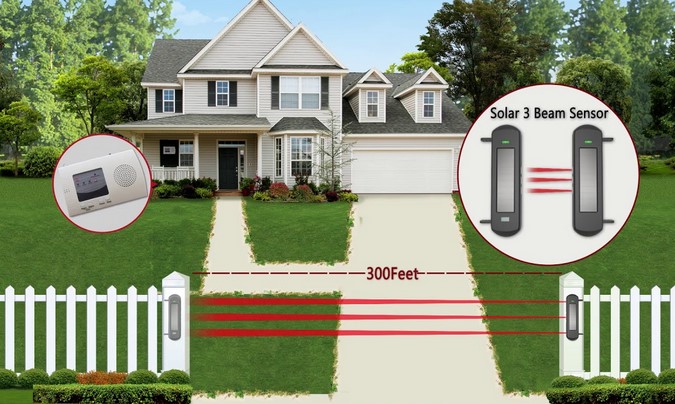
How a Solar Driveway Alarm Actually Works
To the casual observer, it’s just a plastic box on a stake. But inside, the tech is quite elegant. Most modern systems utilize Passive Infrared (PIR) sensors. Think of a PIR sensor like a highly sensitive thermal “tripwire.” It isn’t looking for a visual image; it’s looking for a rapid change in temperature across its field of view. When a warm car engine or a human body moves past the sensor, it creates a “heat signature” that triggers the transmitter.
Because it’s a Solar Driveway Alarm, a small photovoltaic panel on the top keeps an internal lithium-ion battery topped off. Even in overcast regions like the Pacific Northwest where I’ve done numerous installs, these panels are efficient enough to keep the sensor running through the night and deep into a week of storms.
Technical Specs: Range, Frequency, and Interference
If you’re moving from a beginner to an intermediate understanding of home security, you need to look at the transmission range and the detection width.
-
Transmission Range: This is the distance between the sensor (at the driveway) and the receiver (in your house). I always tell clients to look for a “rated” range of at least 1/2 mile. Why? Because walls, trees, and metal siding cut that signal strength in half.
-
Detection Width: Most sensors have a “fan” spread of about 30 feet. If your driveway is wider than that, you might need two sensors “cross-firing” to ensure no one slips through a blind spot.
-
FSK + FHSS Technology: These are technical terms for how the signal travels. Frequency Hopping Spread Spectrum (FHSS) ensures that your neighbor’s garage door opener or a passing ham radio signal won’t trigger your alarm.
Installation Insights: A Professional’s Playbook
In my years of practical experience, the difference between a system that works and one that gives 50 false alarms a day is all in the placement. I’ve seen homeowners mount their Solar Driveway Alarm directly facing the road, causing it to go off every time a school bus passes.
Strategic Placement Rules:
-
The Angle of Attack: Never point your sensor directly at the street. Aim it across your driveway at a 45-degree angle. This ensures the heat source stays in the “detection zone” longer, providing a more reliable trigger.
-
Height Matters: Mount the sensor about 3 to 4 feet high. This is high enough to avoid most small rabbits and cats, but low enough to catch the heat of a car engine or a human torso.
-
Solar Orientation: It sounds obvious, but ensure the solar panel faces South (if you’re in the Northern Hemisphere). I’ve had to go back to “failed” installs just to rotate a sensor 180 degrees so it could actually see the sun.
Avoiding the “False Alarm” Fatigue
The biggest enemy of a security system is a homeowner who turns it off because it’s annoying. If your Solar Driveway Alarm chirps every time the wind blows a tree branch, you will eventually ignore the one time it’s actually a person.
Tips Pro: The Sensitivity Secret
Look for a system with adjustable sensitivity levels. During the summer, heat waves reflecting off hot asphalt can sometimes trick PIR sensors. Setting the sensitivity to “Low” during July and “High” during January can keep your system accurate. Also, clear away any tall “switchgrass” or low-hanging branches within 10 feet of the sensor; moving vegetation is the #1 cause of false triggers.
Integrating with Your Existing Smart Home
For the intermediate user, the Solar Driveway Alarm shouldn’t exist in a vacuum. The best setups I’ve designed link the receiver to a broader ecosystem.
Many modern receivers have relay outputs. This allows you to wire the alarm into a smart home hub. Imagine this: the driveway sensor trips, and automatically, your smart outdoor floodlights turn on, and your hallway tablet switches to the front-gate camera feed. You’ve just moved from a “beep” in the night to an automated fortress.
Weatherproofing and Durability Data
Perimeter gear takes a beating. From 100°F sun to sub-zero blizzards, your Solar Driveway Alarm needs an IP65 or IP66 rating. This “Ingress Protection” code tells you exactly how well the unit handles dust and water.
-
IP65: Can handle rain and low-pressure water jets.
-
IP66: Can handle high-pressure heavy seas or powerful jets.
I’ve pulled apart cheap, unrated sensors that were half-filled with rainwater and ant nests. Don’t skimp on the housing quality; your security depends on that seal holding up for years.
Security is a psychological game as much as a technical one. When you have a Solar Driveway Alarm standing guard, you regain the “high ground.” You are no longer surprised by visitors; you are prepared for them. Whether it’s a delivery driver, a neighbor, or something more’s sinister, you have the information before they have the access.
If you’ve been relying solely on a doorbell camera, you’re only seeing the end of the story. It’s time to write the prologue at the edge of your property.
Is your property currently a “blind spot”? I’d love to hear about your specific layout. Do you have a long winding drive or a short suburban one? Drop a comment below and let’s talk about the best sensor configuration to keep your perimeter hardened!
Would you like me to compare specific solar alarm models or explain how to wire a relay output for your smart lighting system?