Source:https://spriteshield.com
You’ve just spent three weeks and a significant portion of your savings installing gorgeous, wide-plank white oak flooring. It’s the centerpiece of your home renovation. Then, a contractor walks in with a heavy tool chest, drags it across the hallway, and—crunch. A deep, jagged gouge mars the finish. In that split second, your brand-new “asset” has depreciated by thousands of dollars.
In my 10-plus years of managing job sites, I’ve learned that the difference between a professional finish and a DIY disaster isn’t just the quality of the paint or the tile; it’s the quality of the Floor Protection Paper used before the first hammer even swings. Most beginners view floor prep as an annoying chore. I view it as cheap insurance for your home’s most vulnerable surfaces.
The High Cost of “Saving Time” on Prep
When I first started in this industry, I thought a few old bedsheets or some thin plastic drop cloths were enough. I was wrong. I once saw a spilled gallon of dark mahogany stain seep right through a “heavy-duty” plastic sheet on a windy day, ruining a client’s marble foyer.
The reality is that construction sites are combat zones for flooring. Between dropped screwdrivers, muddy work boots, and the constant vibration of power tools, your floors are under siege. Using a dedicated Floor Protection Paper isn’t just about cleanliness; it’s about structural surface integrity. It provides a sacrificial layer that takes the beating so your hardwood, tile, or stone doesn’t have to.
The “Body Armor” Analogy
Think of your floor like a high-end smartphone. You wouldn’t dream of carrying it around without a screen protector and a sturdy case. Floor Protection Paper is the tempered glass for your home. It’s a thin, resilient shield designed to absorb impact and resist liquids, ensuring that the “screen” underneath remains flawless until the reveal.
Technical Breakdown: Choosing the Right Floor Protection Paper
Not all paper is created equal. If you go to a local hardware store, you’ll see rolls of brown paper that look identical. However, for serious site maintenance, you need to understand the technical specs.
1. Thickness and Weight (Mils and Points)
Professional-grade paper is usually measured in “mils” or “points.” For a medium-duty renovation, you want something at least 10 to 20 mils thick.
-
The Pro Insight: If you are moving heavy appliances like a refrigerator or a range, skip the thin red rosin paper. You need a heavy-duty construction board (often called Ram Board or similar) that can withstand the high-point pressure of appliance wheels.
2. Breathability and Vapor Permeability
This is the most critical technical factor for new builds. If you’ve just finished staining wood or pouring concrete, the surface needs to “breathe” to cure properly.
-
LSI Keywords: Vapor-permeable, curing process, moisture entrapment.
-
Using a non-breathable plastic can trap moisture, leading to “clouding” in the finish or even mold growth under the protection. A high-quality Floor Protection Paper allows gasses to escape while keeping liquids out.
3. Spill Resistance
Look for paper that has a specialized coating. You want a paper that can hold a puddle for at least 30 minutes without soaking through. This gives you time to find a rag and clean up that spilled coffee or paint water before it hits the subfloor.
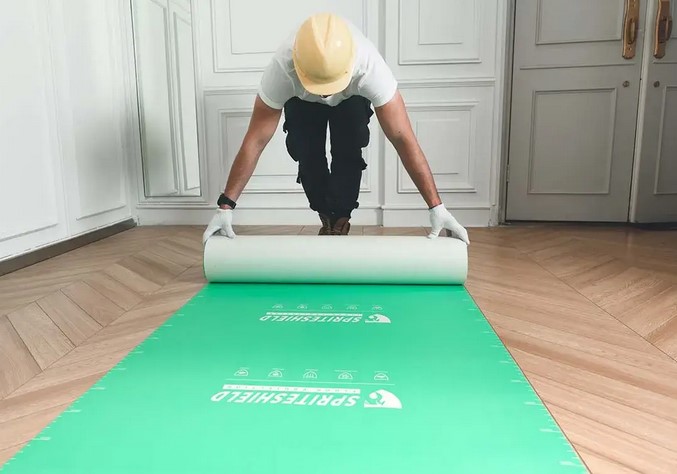
Step-by-Step: The Professional Layout Strategy
Most beginners just roll the paper out and hope for the best. To scale your operational efficiency, you need a systematic approach.
The “Overlap and Tape” Method
-
Sweep Twice: Never lay paper over a dirty floor. A single grain of sand trapped under your paper acts like sandpaper under the weight of your boots, scratching the floor as you walk.
-
The 3-Inch Overlap: When laying parallel runs of Floor Protection Paper, overlap the seams by at least 3 inches.
-
Seam Tape vs. Perimeter Tape: Use heavy-duty seam tape (usually blue or brown) to join the paper to itself. Never tape the paper directly to the floor with high-tack tape. Use a low-tack “delicate surface” painter’s tape for the edges where the paper meets the baseboards.
Managing High-Traffic Zones
In hallways and entryways, I always double-layer. The “pivot points”—where workers turn a corner—experience the most friction. A double layer of Floor Protection Paper ensures that even if the top layer tears, the bottom layer stays intact.
Expert Advice: The “Hidden” Dangers of Rosin Paper
For years, “Red Rosin Paper” was the industry standard. But I have a warning for you: Beware of the red dye. > Expert Warning: If Red Rosin Paper gets wet (from a leak or a spill), the red dye can bleed directly into the grain of unfinished wood or the grout lines of light-colored tile. It creates a permanent stain that is a nightmare to remove. If you are working with expensive or porous materials, always opt for a non-staining, brown kraft-style Floor Protection Paper.
Scaling Flexibility: Beyond Just Floors
Site maintenance isn’t limited to the ground. In my projects, we use the versatility of Floor Protection Paper to scale our protection to other assets:
-
Countertop Protection: When the plumbers are installing faucets, we wrap the granite or quartz countertops in paper to prevent scratches from wrenches.
-
Stair Treads: Stairs are the most dangerous part of a job site. Using pre-creased paper designed for stairs ensures the protection doesn’t slide underfoot.
-
Dust Control: Taping paper over HVAC vents prevents fine drywall dust from entering your furnace system—a mistake that can cost you a $500 duct cleaning later.
Maintenance and Disposal: The Clean Exit
The mark of a true pro isn’t just how they start, but how they finish.
-
Daily Inspection: At the end of every workday, walk the site. If you see a tear in the Floor Protection Paper, patch it immediately with tape. A small hole today is a floor scratch tomorrow.
-
The “Roll and Tape” Disposal: When the project is over, don’t just rip the paper up. Roll it inward so all the dust and debris stay trapped inside the roll. This prevents a “dust cloud” from settling on your freshly painted walls during the final cleanup.
The Bottom Line: ROI of Surface Protection
Let’s talk numbers. A 100-foot roll of high-quality Floor Protection Paper might cost you $30 to $60. Refinishing a damaged hardwood floor costs between $3 and $8 per square foot. For a standard living room, that’s a $1,500 risk vs. a $50 investment. From a professional standpoint, the peace of mind you get from knowing your surfaces are “armored” allows you to work faster and with more confidence. You aren’t constantly looking down; you’re looking at the task at hand.
Conclusion: Don’t Cut Corners on the Cover-Up
Surface asset protection is the unsung hero of home improvement. By implementing a systematic approach to site maintenance with the right Floor Protection Paper, you transition from a “weekend warrior” to a disciplined craftsman. You protect your investment, reduce your stress, and ensure that the “big reveal” at the end of your project is one of joy, not regret.
What’s the most expensive “oops” moment you’ve ever had on a project? Have you ever had a spill soak through your protection? Share your stories in the comments below—I’d love to help you troubleshoot your next site prep!