Category: Outdoor Living

Asset Lifecycle Protection: Ensuring Durability with the Lawn Mower Cover

Source:https://us.mammotion.com

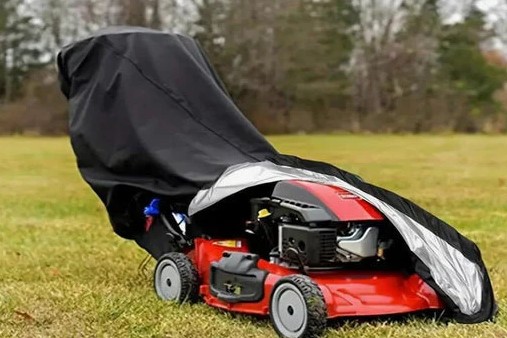
The sky turns a bruised shade of purple, the wind picks up, and suddenly, a torrential downpour begins. Most homeowners rush to grab the patio cushions, but they leave their $400—or $4,000—investment sitting exposed in the corner of the yard or a leaky shed. I’ve seen it hundreds of times: a high-end zero-turn mower reduced to a rusted, sputtering paperweight because of “micro-corrosion.”

In my ten years in the home improvement trenches, I’ve realized that the difference between a tool that lasts thirty years and one that dies in five isn’t just the brand—it’s the storage. People underestimate the slow, silent damage of UV rays, morning dew, and nesting rodents. A high-quality lawn mower cover isn’t just a piece of fabric; it’s an insurance policy for your garage’s most expensive tenant.


The Silent Killers of Outdoor Machinery

When you leave a mower uncovered, you aren’t just letting it get “a little dirty.” You are inviting a chemical and mechanical assault on its vitals. Throughout my career, I’ve performed “autopsies” on dozens of mowers that “just wouldn’t start,” only to find the same culprits.

UV Degradation and Plastic Fatigue

Think of the sun as a slow-motion fire. Constant exposure to UV radiation breaks down the chemical bonds in plastic fuel tanks, spark plug wires, and control levers. I’ve seen vibrant red mowers turn a chalky pink, their plastic components becoming so brittle they snap like crackers under the slightest pressure.

The Condensation Trap

This is the “insider secret” most people miss. Even if your mower is under a roofed porch, temperature fluctuations create condensation inside the engine’s air intake and fuel system. Moisture is the enemy of combustion. A breathable lawn mower cover acts like a high-tech rain jacket—it keeps the liquid out while allowing internal moisture to “sweat” away.


Anatomy of a Professional Lawn Mower Cover

Not all covers are created equal. If you buy a cheap, tarp-like plastic cover from a discount bin, you might actually be doing more harm than good by trapping heat and moisture against the metal. Here is what I look for when I’m auditing a client’s equipment setup.

Material Density (The Denier Count)

In the world of textiles, we talk about Denier (D). This measures the thickness of the fibers.

  • 300D: Lightweight, okay for indoor dust protection in a sealed garage.

  • 600D and above: The gold standard. This is heavy-duty marine-grade polyester that can withstand heavy snow and high winds.

Essential Technical Features

  • PU (Polyurethane) Coating: This is a layer applied to the inside of the fabric to ensure it is hydrophobic (water-repelling).

  • Taped Seams: Just like a professional tent, the seams where the fabric is sewn are the weakest points. Look for “heat-sealed” or “taped” seams to prevent water from seeping through the needle holes.

  • Elasticized Hems and Drawstrings: In a windstorm, a loose cover becomes a sail. I’ve seen mowers tipped over because a loose cover caught a gust of wind. You want a snug fit that hugs the wheels.


Why Every Mower Needs a Shield: From Push to Riding

Whether you have a compact electric mower or a heavy riding tractor, the logic of protection remains the same.

For the Modern Electric Mower

Electric mowers are essentially computers on wheels. They have circuit boards, lithium-ion battery ports, and sensitive wiring. While they are designed to be robust, they are far less “forgiving” of moisture than old-fashioned gas engines. Using a lawn mower cover for an electric model is non-negotiable if you want to avoid expensive electrical shorts.

For the Gas-Powered Workhorse

For gas mowers, the cover protects the fuel cap and air filter. If water gets into the fuel tank through a vented cap, your engine will stall, and you’ll be looking at a $100 carburetor cleaning bill. I like to think of the cover as the mower’s “immune system”—it keeps the external pathogens (dirt, water, and debris) away from the vital organs.


Choosing the Right Size: The “Tailored Suit” Analogy

You wouldn’t wear a tuxedo that is three sizes too big, and you shouldn’t do that to your mower. An oversized cover will sag, creating “pools” of water that eventually leak through.

  • Small/Medium: Typically fits standard walk-behind or “push” mowers.

  • Large/XL: Designed for riding mowers and small lawn tractors.

  • Zero-Turn Specific: These have a unique “boxy” shape to accommodate the high seat and control arms.

Measurement Tip: Always measure from the tip of the front deck to the rear of the bagger. If your mower has a side-discharge chute, make sure the width measurement includes that protruding piece!


Pro Advice: Maximizing Your Mower’s Life

Tips Pro: The “Cool Down” Rule

Never throw a heavy-duty cover over a mower the second you finish cutting the grass. The engine and exhaust can reach temperatures over 200°F. If you cover it immediately, you risk melting the PU coating of the cover or, worse, creating a fire hazard. Give it 20 minutes to “breathe” before tucking it in.

Rodent Real Estate

In the winter, a covered mower is a luxury hotel for field mice. They love to chew on the spark plug wires and nesting in the engine shroud. My expert trick: Tucked a few dryer sheets or a small bag of mothballs under the cover near the engine deck. The scent drives rodents away without damaging the machine.


The ROI of Proper Storage

Let’s look at the numbers. A high-quality lawn mower cover costs between $25 and $60. A mid-range mower costs $400. If that cover extends the life of your mower from 6 years to 12 years (which is very common with proper care), you are effectively saving yourself $66 per year in depreciation costs.

Beyond the money, there is the “aggravation factor.” There is nothing worse than waking up on a Saturday morning ready to tackle the yard, only to find your mower won’t start because the electronics got damp overnight. Consistency is the key to a great lawn, and a protected mower is a reliable mower.


Conclusion: Don’t Let Your Investment Rust Away

In my decade of home improvement, I’ve learned that the most successful homeowners aren’t the ones with the most expensive tools—they are the ones who take care of the tools they have. Transitioning from a “disposable” mindset to an “asset protection” mindset starts with small steps.

Investing in a lawn mower cover is a clear signal that you value your equipment and your time. It’s the difference between a frustrating morning of mechanical troubleshooting and a satisfying afternoon of perfectly manicured grass.

What’s your current storage setup like? Is your mower tucked away safely, or is it battling the elements as we speak? Drop a comment below if you have questions about specific materials or sizing—I’ve seen almost every brand under the sun and I’m happy to help you find the right fit!

Renewable Perimeter Lighting: Strategic Integration of Solar Deck Caps

Source:https://www.thedecksupply.com

You’ve finally finished that perfect backyard deck—the wood is stained, the grill is prepped, and the patio furniture is perfectly arranged. But as the sun dips below the horizon, your outdoor oasis transforms into a pitch-black obstacle course. You consider hardwired lighting, but then you see the quote for the electrician and the nightmare of tearing up your new floorboards to run conduits.

In my ten years of building and renovating outdoor living spaces, I’ve seen homeowners spend thousands on “luxury” lighting only to regret the maintenance and energy bills. This is where Solar Deck Caps move from a simple accessory to a masterstroke of renewable perimeter lighting.


The “Dark Deck” Dilemma: Beyond Aesthetics

When I walk onto a property for a night-time consultation, I don’t just look at how pretty the lights are. I look at safety and boundary definition. A deck without perimeter lighting is like a hallway without a floor—you know where you start, but you have no visual cue for where the edge ends.

I once worked with a client who had a beautiful elevated cedar deck. They hosted a dinner party, and a guest nearly took a nasty spill because the transition from the deck to the stairs was invisible in the shadows. We fixed it the next day with a systematic installation of Solar Deck Caps. No wires, no trenching, and most importantly, no more safety hazards.

The “Lighthouse” Analogy

Think of your deck posts as the coastline of your property. Hardwired spotlights are like massive searchlights—blinding and aggressive. Solar Deck Caps, on the other hand, are like lighthouses. They provide a steady, rhythmic “glow” that defines the boundary, guides the traveler, and creates a sense of security without overwhelming the senses.


The Technical Anatomy of a High-Performance Solar Deck Cap

For beginners, a “solar light” might seem like a cheap plastic toy. But for the intermediate home improver, understanding the internal components is the key to scaling your outdoor branding.

1. Photovoltaic (PV) Cells and Conversion Rates

Not all solar panels are created equal. High-quality Solar Deck Caps use Monocrystalline Silicon panels rather than the cheaper polycrystalline versions. Why? Because monocrystalline cells have a higher efficiency rate, meaning they can charge your batteries even on those hazy, overcast afternoons that are common in spring.

2. Battery Chemistry: Ni-MH vs. LiFePO4

This is where the “Expert Advice” comes in. Most entry-level caps use Nickel-Metal Hydride (Ni-MH) batteries. They are fine, but if you want longevity, look for Lithium Iron Phosphate (LiFePO4). These batteries handle the extreme temperature swings of outdoor life—from scorching summer afternoons to freezing winter nights—much better than their cheaper counterparts.

3. Lumens and Light Dispersion

For perimeter lighting, you aren’t looking to light up a stadium. You want a soft ambient glow, usually between 5 to 15 Lumens.

  • Pro Insight: Look for caps with “down-lighting” optics. These reflect the light downward onto the post and the deck floor rather than shooting it up into the sky. This reduces light pollution and keeps the focus on your architectural lines.


Strategic Integration: Scaling Your Perimeter Workflow

Efficiency in home improvement isn’t just about the tools; it’s about the strategy. Installing Solar Deck Caps is 10% labor and 90% placement.

The “Post-to-Post” Ratio

You don’t necessarily need a light on every single post. In fact, over-lighting can make your deck look like a runway.

  • The Rule of Alternation: I typically recommend placing a cap on every other post for a standard 4×4 or 6×6 railing system. This creates a balanced “rhythm” of light and shadow that is much more pleasing to the eye.

Sizing and Fitment Precision

One of the most common mistakes I see is the “rattle fit.” A 4×4 wood post is rarely exactly 4 inches; it’s usually 3.5 inches (nominal size).

  • Technical LSI: Always check if the Solar Deck Caps come with adapter bases or if they are “True-Size” vs. “Nominal-Size.” A loose cap will collect moisture underneath, leading to premature post-rot.


Expert Advice: The “Hidden” Maintenance of Solar Assets

People often think solar is “set it and forget it.” While it’s low maintenance, it’s not no maintenance. If you want your renewable lighting to last five years instead of five months, follow these pro steps:

  • The Microfiber Wipe: Every few months, give the solar panels a quick wipe with a damp microfiber cloth. Pollen, dust, and bird droppings act like a “dimmer switch” for your solar cells, reducing their ability to charge.

  • Sealing the Base: Even if the cap fits perfectly, I always run a very thin, invisible bead of Clear Silicone Caulk around the inside rim before snapping it onto the post.


The ROI of Going Solar: Energy and Longevity

Let’s talk numbers. A hardwired low-voltage system for a medium-sized deck can cost between $800 and $2,500 once you factor in the transformer, heavy-gauge wire, fixtures, and labor.

A premium set of Solar Deck Caps will cost you roughly $150 to $300.

  • Energy Savings: They cost $0.00 to operate.

  • Asset Protection: By capping your wooden posts, you are protecting the end-grain of the timber from rain and UV damage, which is the #1 cause of post-splitting and rot. You are essentially combining a lighting upgrade with a structural preservative.


Environmental Context: The “Dark Sky” Movement

As a home improvement expert, I’m seeing a massive shift toward Dark Sky Compliance. Modern Solar Deck Caps are designed to keep light focused downward. This is better for your neighbors, better for local wildlife (like migratory birds and fireflies), and creates a much more sophisticated “resort-style” feel for your home.


Conclusion: Lighting the Way Home

Your deck is the bridge between your sanctuary and the great outdoors. By integrating Solar Deck Caps, you aren’t just adding “lights”; you are implementing a renewable, strategic management system for your property’s perimeter. You are choosing a path that balances modern efficiency with architectural beauty.

Stop stumbling in the dark and stop overpaying the electric company for your outdoor ambiance. The sun provides all the power you need—you just need the right hardware to capture it.

Does your deck currently disappear when the sun goes down, or are you looking to upgrade an old, flickering wired system? What’s the biggest challenge you face with your outdoor lighting? Drop a comment below—I’d love to help you shed some light on your next project!