
Source : https://cdn2.hubspot.net
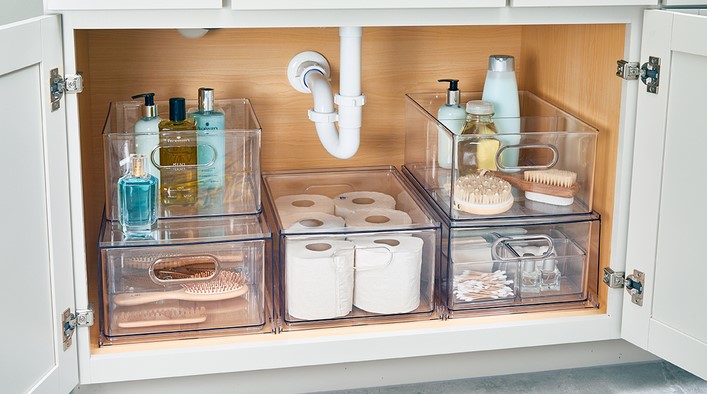
When it comes to optimizing small spaces, one often-overlooked area in the home is the under-sink cabinet. Whether it’s in your kitchen, bathroom, or laundry room, this space can quickly become cluttered with cleaning supplies, toiletries, or various household items. However, with the right under-sink storage hacks, you can transform this often-disorganized space into a functional, efficient storage area. In this article, we’ll explore creative ways to maximize the potential of under-sink areas, allowing you to create more room for the things you use regularly while keeping your home neat and tidy.
1. Use Stackable Organizers for Vertical Storage
One of the most effective under-sink storage hacks is utilizing vertical space. Under-sink areas often have limited floor space due to plumbing pipes, but you can still make the most of the height available. Stackable organizers, such as plastic bins, baskets, or modular shelves, are a great way to take advantage of vertical space without crowding the area.
Benefits of Stackable Organizers:
- Maximized Space: These organizers allow you to create multiple tiers for storing items, so you can keep everything within easy reach without everything getting buried at the bottom.
- Accessibility: When everything is stacked neatly, it’s much easier to access what you need without having to pull everything out of the cabinet.
- Customization: Stackable organizers come in a range of sizes and materials, meaning you can tailor them to suit the unique dimensions and shape of your under-sink space.
For a bathroom cabinet, stackable baskets can be used to separate items like extra toilet paper, cleaning products, and toiletries. In a kitchen, stackable bins are perfect for keeping cleaning supplies, sponges, and dish towels organized.
2. Install Pull-Out Drawers or Shelves
Another excellent under-sink storage hack is the installation of pull-out drawers or shelves. Many under-sink spaces can be difficult to access, especially if there are pipes or other obstructions in the way. Pull-out solutions make it much easier to utilize every inch of the space, allowing you to pull out shelves or drawers and access your items without needing to bend down or dig through clutter.
Why Pull-Out Drawers Are Ideal:
- Effortless Organization: Pull-out drawers create compartments where you can group similar items together. For example, in a kitchen, one drawer could hold dishwashing items, another could hold cleaning supplies, and a third could store extra garbage bags.
- Easy to Install: Many pull-out drawer systems are designed to fit in existing cabinets, and they often require minimal installation, making them a user-friendly option for DIY projects.
- Maximized Access: With pull-out drawers, there’s no need to crawl on your hands and knees to retrieve items buried at the back of the cabinet. Everything is easily accessible with just a gentle pull.
This solution is particularly helpful in bathrooms, where small items like hair care products, toothpaste, and cleaning solutions can easily get lost in the clutter.
3. Make Use of Tension Rods and Hooks
Sometimes, it’s the simple under-sink storage hacks that make the biggest difference. Tension rods and hooks can be used creatively to organize items hanging or stored underneath your sink. These solutions help you save floor space while keeping your cleaning tools, sprays, and even extra supplies neatly stored in a way that’s both practical and visible.
How Tension Rods and Hooks Work:
- Tension Rods: Install a tension rod horizontally across the cabinet to hang cleaning supplies, such as spray bottles, from their nozzles. This keeps your bottles upright, easily accessible, and prevents them from taking up space on the floor of the cabinet.
- Hooks: By adding a few small hooks to the inside of the cabinet door, you can hang items like rubber gloves, brushes, or small cleaning towels. These hooks can also be used to store accessories, like extra sponges or trash bag rolls, to keep them off the ground.
This strategy works well in both kitchens and bathrooms. It can also be adapted to fit narrow cabinets or other awkward spaces where traditional storage solutions wouldn’t work.
4. Opt for Adjustable and Pull-Down Shelves
If you’re dealing with a particularly deep under-sink cabinet, adjustable or pull-down shelves are an ideal storage solution. These shelves can be customized to fit your needs, making them a great way to store a variety of items at different heights. Adjustable shelving is especially useful if you have large or bulky items that need to fit snugly, such as cleaning buckets or tall bottles.
Advantages of Adjustable Shelving:
- Flexible Storage: With adjustable shelves, you can reconfigure the layout to accommodate different sizes of items, ensuring that you don’t waste valuable space.
- Easy Access: Pull-down shelves can be installed in upper cabinets to bring items within reach, especially useful for deeper cabinets that are hard to navigate.
- Enhanced Organization: With shelves that can be set at different heights, you can easily separate and organize various products, keeping everything in its designated place.
This system is particularly effective for kitchen cabinets where you might need space for pots, pans, or large cleaning products.
Under-sink storage doesn’t have to be a source of frustration or clutter. With the right under-sink storage hacks, you can create a more organized, accessible space in even the smallest areas. Whether you opt for stackable organizers, pull-out drawers, tension rods, or adjustable shelves, these clever solutions allow you to maximize every inch of under-sink space. By using the tips shared in this article, you can optimize your home’s storage while reducing clutter, making it easier to find and use everyday essentials. Start implementing these ideas today and take control of your under-sink areas for a tidier, more functional home.

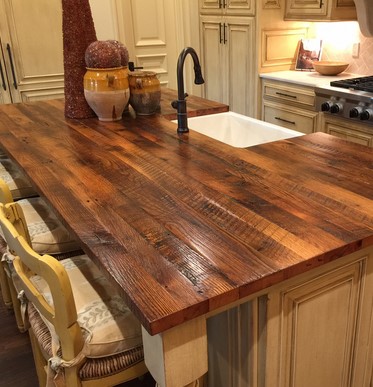 Rustic Radiance is a unique and timeless way to add charm to any home. Crafting a reclaimed wood countertop is a great way to bring a rustic, yet modern look to your kitchen or bathroom. Reclaimed wood is a great way to add character and warmth to any space. With the right tools and techniques, you can create a beautiful and unique countertop that will last for years to come. In this guide, we will discuss the steps to creating a reclaimed wood countertop, the materials needed, and the best practices for installation. With a little bit of effort, you can create a timeless and beautiful countertop that will be the envy of all your friends.
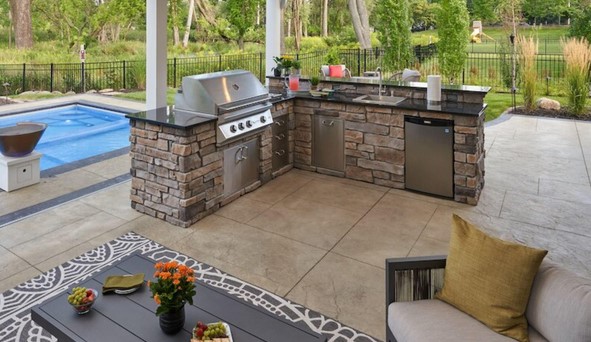 Welcome to Kitchen Oasis, the ultimate resource for stylish outdoor kitchen designs. Whether you’re looking to create a cozy gathering spot for friends and family or a luxurious outdoor entertaining area, we have the perfect outdoor kitchen design for you. Our collection of outdoor kitchen pictures will inspire you to create a beautiful and functional outdoor kitchen that will be the envy of your neighborhood. From classic to modern, we have a variety of outdoor kitchen designs to choose from. With our help, you can create an outdoor kitchen that is both stylish and functional. So, let’s get started and create the perfect outdoor kitchen for your home.