
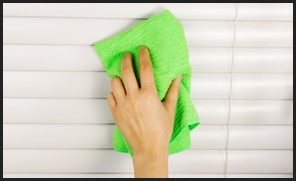
Expert Tips for A Clean Fridge in 2022

Introduction

When you’re cooking delicious food every day, the fridge needs to be restocked constantly and is bound to get messy. It is one of the most heavily used appliances in your home and if you don’t keep it clean, you’ll have a giant hygiene problem and also reduce the lifespan of your fridge. If your fridge breaks down, you can search for “cleaning services near me” and hire professionals to fix it for you. For now, let’s check out a few expert tips for cleaning your fridge.

Tips & Tricks

  1. Empty out the fridge and take inventory – To begin cleaning, you need to empty out the fridge. Pull out everything on the kitchen countertop, empty cabinets, and drawers, and start taking inventory. Check the expiry dates and put those products aside for throwing them out in the garbage or into the compost bin.

Wipe the underside of sticky jars and bottles before putting them on the counter. Put dairy and meat products in a cooler with a ton of ice. Moreover, it’s best to time the fridge cleaning right before shopping for groceries and fresh produce. That way, the fridge stays mostly empty, and cleaning it out doesn’t become a nightmare.

  1. Take out fittings and shelves – You may have cracked plastic shelves numerous times while trying to bring them out of the fridge during cleaning day. That happens since plastic becomes more brittle and crack-prone when it’s cold. This can easily be avoided by turning off the refrigerator and letting the plastic shelves reach room temperature to be more flexible. The same holds for glass shelves. After all the shelves and fittings reach room temperature, you can put them in hot soapy water for soaking.
  1. Clean the inside – Start cleaning the inside of the fridge with vinegar. Bring out the drawers and shelves and spray the interior surface with a solution of water and distilled vinegar. Spray more on areas that have dried gunk or food buildup. Allow the interior surface to soak in that vinegar solution while you clean the removed shelves and drawers.

After you’re done cleaning the shelves and drawers, you can wipe down the interior surface of the fridge with a damp and soft microfiber cleaning cloth. The vinegar solution shouldn’t just remove filth and kill off germs, but also remove any bad odor. Make sure to wipe from the top to bottom so that debris falls to the bottom, and you don’t need to do extra redundant cleaning later on.

While there are other products you can find at the department store for cleaning your fridge, they may leave chemical residue and odors that may be absorbed by the food. That’s why vinegar is a better cleaning agent. It’s all-natural and doesn’t harm the environment either. The same holds for baking powder. If vinegar doesn’t get the job done, you can make a paste of baking powder with some warm water and use it for cleaning the fridge.

  1. Clean the drain hole – When you clean your fridge, it’s best to include the drain hole in the deep clean routine. Remove the crisper drawers from the fridge and use a plumbing snake or some other type of drain hole cleaning device to get rid of any blockage. If the blockage was there for a long time, it’s highly likely that the back of your fridge hides a nasty surprise.

That means you may witness a lot of bacteria, mold, and mildew. To clean that out without gagging, wear a mask and use a basting syringe to pour in a bit of vinegar and water into the drain hole. Next, use a cotton swab to work the vinegar solution on the walls of the drain hole to remove residual deposits. Finally, use the vinegar solution to wipe the bottom of the fridge before putting back the crisper drawers.

  1. Clean out the drawers and shelves – Assuming that you’ve removed the fridge drawers entirely and soaked them in warm soapy water, it’s time to scrub them with an old toothbrush or a bottle brush. Next, rinse, pat, and dry them before putting them back in the refrigerator. Make sure that the drawers and the interior surface of your fridge are completely dry before putting them back.

After your fridge shelves have been drying for a long time, it’s time to scrub them carefully with a  soft sponge. If the shelf grooves have visible gunk on the grooves, you can use an old toothbrush, or a cotton swab soaked in vinegar and water for cleaning those areas. Next, rinse and allow them to dry out before putting them back inside the fridge.

  1. Wipe down the seals – Fridge door seals look very insignificant. However, those strips of rubber are very important for maintaining the cooling efficiency of your fridge. If you notice dry crumbs and particles on the seal, you can vacuum them out. Next, wrap a blunt knife with a soft cloth, soak it in vinegar and run it gently along the crevices of the rubber seals. Repeat the process with a dry and soft cloth wrapped around a blunt knife in order to dry that part off.
  1. Clean the freezer – After your freezer compartment has thawed and the ice starts to melt away, use a defroster ice shovel to carefully remove the ice without damaging the lining. Next, fill up a spray bottle with equal parts of warm water and vinegar and start spraying all across the walls. Now, repeat the same things you did for cleaning the interior walls of the refrigerator’s main compartment. After the fridge is dry and clean, switch it on. Allow it to reach the desired cold temperature before restocking it with food. You can clean the external surface of the fridge during that time.

Conclusion 

You spend a lot of time researching the best fridge you can buy within your budget. That’s why you need to make sure that your refrigerator is cleaned off properly to discourage infestation and bacteria growth. Otherwise, your fridge may break down easily and you may need to look up “cleaning services near me” to hire professionals for fixing it up.
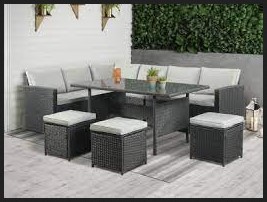
The Hidden Mystery behind Outdoor Furniture

Generally, we provide more consideration to the insides of our domestic rather than open air settings. But the fact is that we are able to upgrade the space whereas utilizing the open air zone. You’ll be more over improving the magnificence and grace of your domestic on the off chance that you pay a small consideration to your outdoor zone. Whereas utilizing an open air area you will be able to dodge pressure to serve a part of visitors at your living place effortlessly so, the ornamentation for your outdoor places the best thing that you can avail yourself of better productive outdoor furniture nz. By following some things you will be able to form your outdoor area appealing and valuable. For illustration, you will be able to utilize this open place by setting some amenities in conjunction with enrichment pieces. The primary thing that comes to your mind is that furniture can destroy in open air zones since of daylight or rain. But presently this issue has been settled with the best choice of outdoor furniture. If they will be made with hard material that is resistant to all sort of climate conditions.

Styles of outdoor furniture

There are vast kinds of pieces of furniture that you can appreciate as outdoor amenity. It can be space-saving, and you can get regarding your desire and interest. These pieces of furniture can also be kept inside the room or lounge. But preferably, when we wish to furnish our open places too, outdoor furniture keeps the best place in our choice. There are several styles available at hand:

  • Lounger sets
  • Feasting sets
  • Couch sets
  • Hanging swing chairs
  • Day beds

These couch sets can be of 2, 3, 4, 5, 6 or 7.  Along with the designs, assortment of colors is also there for a purchaser. Afterwards, you can select it according to your home theme. This selection depends on your requirement and choice.

The Finest Choice of Outdoor Furniture

There are so numerous reasons to select outdoor furniture, and to demonstrate why this selection is the finest one. A few of them are specified below:

  • You can keep your favorite animal pets along with you on your settee in the evening time.
  • The use of canopy outdoor will provide the shade to you, and you can stay there for a long time even during sunny day.
  • Children can get swings in their free time which you can hang with the boughs of your shady trees in your open yard.
  • Now, you can get the swing chair as well for an adult person who relieved itself by sitting under the shades of your favorite tree.

Protection of your outdoor furniture

  • It is exceptionally designed light weight, and can effortlessly move a single individual without any tension.
  • You can wipe the dirt particles from your outdoor furniture with warm water.
  • The wood ought to be used free from creepy crawlies.
  • Use the essentials covers of coarse fabric to prevent them from the effect of harsh climate.

Small Front, Big Impact: Landscaping Ideas for Your Petite Yard

Small Front, Big Impact: Landscaping Ideas for Your Petite Yard is a comprehensive guide to creating a beautiful and functional outdoor space, even if you have a small yard. This book provides readers with a wealth of ideas and tips for making the most of their limited space. From selecting the right plants and materials to creating a cohesive design, this book covers all the basics of landscaping for small yards. With detailed instructions and helpful illustrations, readers will be able to create a stunning outdoor space that is both attractive and practical. Whether you are looking to create a cozy retreat or a vibrant outdoor living space, this book will provide you with the tools and inspiration you need to make your petite yard a success.

Maximizing Your Small Front Yard: Creative Landscaping Ideas for a Petite Space

Creating a beautiful and inviting front yard can be a challenge when you have a small space to work with. However, with a few creative landscaping ideas, you can maximize your small front yard and make it a welcoming and attractive part of your home.

One of the best ways to make the most of a small front yard is to use plants that are low-maintenance and require minimal upkeep. Consider planting shrubs, ground covers, and other plants that are easy to care for and don’t require frequent pruning or trimming. This will help keep your yard looking neat and tidy without taking up too much of your time.

Another great way to maximize your small front yard is to use vertical elements to create the illusion of more space. Consider adding a trellis or arbor to your yard, or planting climbing vines or shrubs that can be trained to grow up and around a structure. This will help draw the eye upward and create the illusion of a larger space.

If you have a small front yard, you may also want to consider adding a few hardscaping elements to create a more inviting space. Consider adding a small patio or seating area, or a pathway that leads to your front door. This will help create a sense of flow and make your front yard feel more inviting.

Finally, don’t forget to add a few decorative elements to your small front yard. Consider adding a few potted plants, a birdbath, or a small water feature to add a touch of beauty and charm to your space.

With a few creative landscaping ideas, you can maximize your small front yard and make it a beautiful and inviting part of your home. With the right plants, hardscaping elements, and decorative touches, you can create a space that is both functional and attractive.

Making a Big Impact with Little Space: Tips for Landscaping a Small Front Yard

Creating a beautiful and inviting front yard doesn’t have to be a daunting task, even if you have limited space. With a few simple tips and tricks, you can transform your small front yard into a stunning outdoor oasis.

First, consider the size of your space. Measure the area and make a plan for how you want to use it. This will help you determine the types of plants and features that will work best.

Next, choose plants that are suitable for the size of your yard. Smaller plants, such as shrubs and ground covers, are ideal for small spaces. They will provide texture and color without taking up too much room.

When selecting plants, think about how they will look throughout the year. Choose plants that will provide color and interest in all seasons.

Include hardscaping elements, such as pathways, patios, and seating areas, to create a sense of structure and order. These features will also help to define the space and make it feel larger.

Finally, add lighting to your landscape. Lighting can be used to highlight certain features and create a warm and inviting atmosphere.

By following these tips, you can make a big impact with a small front yard. With a little planning and creativity, you can create a beautiful outdoor space that you can enjoy for years to come.

Conclusion

Small Front, Big Impact: Landscaping Ideas for Your Petite Yard is a great resource for homeowners with small yards who want to make the most of their outdoor space. With creative ideas for landscaping, hardscaping, and garden design, this book provides a wealth of information and inspiration for transforming a small yard into a beautiful and functional outdoor living space. Whether you’re looking to create a cozy outdoor retreat or a vibrant and inviting outdoor entertaining area, this book has the ideas and tips you need to make your petite yard a big success.

Patio Paradise: Planning Your Perfect Patio for Outdoor Living

Welcome to Patio Paradise: Planning Your Perfect Patio for Outdoor Living! Whether you’re looking to create a cozy outdoor space for entertaining friends and family, or a tranquil retreat for relaxing and unwinding, we’ve got you covered. We’ll help you plan the perfect patio for your outdoor living needs, from selecting the right furniture and accessories to creating a beautiful landscape design. With our expert advice and tips, you’ll be able to create a patio paradise that you’ll love for years to come.

Designing a Patio Paradise: Tips for Creating the Perfect Outdoor Living Space

Creating the perfect outdoor living space can be a daunting task, but with the right tips and tricks, you can design a patio paradise that you and your family will enjoy for years to come. Here are some tips for designing a patio paradise:

1. Choose the Right Location: When selecting the location for your patio, consider the amount of sunlight it will receive, the amount of space you have available, and the views you want to enjoy.

2. Select the Right Materials: Choose materials that are durable and weather-resistant, such as concrete, stone, or brick. Consider the color and texture of the materials to ensure they complement the rest of your outdoor living space.

3. Incorporate Seating: Make sure to include comfortable seating options, such as chairs, benches, or sofas. Consider adding cushions or pillows for extra comfort.

4. Add Shade: Incorporate shade into your patio design with an umbrella, awning, or pergola. This will help keep your outdoor living space cool and comfortable during hot summer days.

5. Add Lighting: Incorporate lighting into your patio design to create a cozy atmosphere and extend the use of your outdoor living space into the evening hours.

6. Incorporate Greenery: Add plants, flowers, and trees to your patio design to create a lush and inviting atmosphere.

7. Add Accessories: Incorporate accessories such as outdoor rugs, pillows, and artwork to add color and texture to your patio design.

By following these tips, you can create a patio paradise that you and your family will enjoy for years to come. With the right materials, seating, shade, lighting, greenery, and accessories, you can create an outdoor living space that is both beautiful and functional.

Maximizing Your Patio Space: Ideas for Planning an Efficient and Enjoyable Patio Layout

Creating an efficient and enjoyable patio layout is an important part of maximizing your outdoor space. With a few simple tips and tricks, you can make the most of your patio and create a space that is both functional and aesthetically pleasing.

First, consider the size and shape of your patio. This will help you determine the best layout for your space. If your patio is small, you may want to focus on creating a cozy atmosphere with comfortable seating and a few decorative elements. If your patio is larger, you can create multiple seating areas and incorporate more decorative elements.

Next, think about how you plan to use your patio. If you plan to entertain, you may want to create a larger seating area with plenty of space for guests. If you plan to use your patio for relaxing, you may want to create a more intimate seating area with comfortable chairs and a few decorative elements.

Once you have determined the size and shape of your patio and how you plan to use it, you can begin to plan the layout. Consider the placement of furniture, plants, and other decorative elements. Make sure to leave enough space for people to move around comfortably.

When selecting furniture, choose pieces that are both comfortable and stylish. Look for pieces that are made from durable materials that can withstand the elements. If you plan to entertain, choose pieces that are large enough to accommodate multiple people.

When it comes to plants, choose varieties that are suited to your climate and will thrive in your outdoor space. Consider adding a few potted plants to add color and texture to your patio.

Finally, add a few decorative elements to complete the look. Consider adding a few outdoor rugs, string lights, or a fire pit to create a cozy atmosphere.

By following these tips, you can create an efficient and enjoyable patio layout that will maximize your outdoor space. With a few simple changes, you can transform your patio into a comfortable and inviting space that you and your guests will enjoy.

Conclusion

Patio Paradise: Planning Your Perfect Patio for Outdoor Living is an invaluable resource for anyone looking to create a beautiful and functional outdoor living space. With its comprehensive guide to patio design, materials, and furniture, Patio Paradise provides all the information needed to create a stunning outdoor oasis. Whether you’re looking to create a cozy outdoor retreat or a luxurious outdoor entertaining space, Patio Paradise has the tips and tricks to make it happen. With its helpful advice and easy-to-follow instructions, Patio Paradise is the perfect guide for anyone looking to create their own outdoor paradise.

Gravel Pathways: A Guide to Designing and Installing Gravel Walkways

Gravel pathways are a great way to add a unique and attractive feature to your outdoor space. They are easy to install and maintain, and can be used to create a variety of different looks. This guide will provide you with all the information you need to design and install a gravel walkway in your yard. We will cover topics such as choosing the right type of gravel, preparing the area, laying the gravel, and maintaining your walkway. With this guide, you will be able to create a beautiful and functional gravel pathway that will last for years to come.

How to Choose the Right Gravel for Your Pathway: Tips for Selecting the Best Material for Your Walkway

When selecting the right gravel for your pathway, there are several factors to consider. The type of gravel you choose will depend on the purpose of your pathway, the climate in your area, and the amount of maintenance you are willing to do. Here are some tips to help you choose the best material for your walkway.

1. Consider the Purpose of Your Pathway: The type of gravel you choose should depend on the purpose of your pathway. If you are creating a pathway for pedestrians, you will want to choose a material that is smooth and comfortable to walk on. If you are creating a pathway for vehicles, you will want to choose a material that is strong and durable.

2. Consider the Climate in Your Area: The climate in your area will also affect the type of gravel you choose. If you live in an area with a lot of rain or snow, you will want to choose a material that is resistant to water damage. If you live in an area with extreme temperatures, you will want to choose a material that is heat and cold resistant.

3. Consider the Amount of Maintenance You Are Willing to Do: The amount of maintenance you are willing to do will also affect the type of gravel you choose. If you are willing to do regular maintenance, such as raking and weeding, you can choose a material that is more decorative. If you are not willing to do regular maintenance, you will want to choose a material that is low-maintenance.

By considering the purpose of your pathway, the climate in your area, and the amount of maintenance you are willing to do, you can choose the right gravel for your pathway. With the right material, your pathway will be both attractive and functional.

DIY Gravel Pathway Installation: A Step-by-Step Guide to Installing a Gravel Walkway in Your Yard

Installing a gravel pathway in your yard is a great way to add a touch of beauty and charm to your outdoor space. Not only is it an attractive addition to your landscape, but it is also a practical solution for creating a safe and accessible walkway. With a few simple steps, you can easily create a beautiful gravel pathway in your yard.

Step 1: Plan Your Pathway

Before you begin, it is important to plan out your pathway. Decide on the size, shape, and location of your pathway. Consider the existing landscape and the amount of space you have available. Make sure to measure the area and draw a diagram of the pathway.

Step 2: Prepare the Area

Once you have planned out your pathway, it is time to prepare the area. Start by removing any existing vegetation and debris from the area. If necessary, use a shovel to level the ground.

Step 3: Install Edging

To keep the gravel in place, you will need to install edging along the sides of the pathway. You can use plastic edging, metal edging, or wooden edging. Make sure to secure the edging in place with stakes or nails.

Step 4: Add Gravel

Once the edging is in place, you can begin adding the gravel. Start by spreading a layer of gravel over the entire area. Use a rake to spread the gravel evenly and to fill in any low spots.

Step 5: Compact the Gravel

Once the gravel is spread, you will need to compact it. Use a hand tamper or a plate compactor to compact the gravel. This will help to ensure that the pathway is even and stable.

Step 6: Add Finishing Touches

Once the gravel is compacted, you can add any finishing touches. You can add decorative stones or plants along the edges of the pathway. You can also add a layer of mulch to help keep the gravel in place.

Installing a gravel pathway in your yard is a great way to add beauty and charm to your outdoor space. With a few simple steps, you can easily create a beautiful and practical pathway.

Conclusion

Gravel pathways are an attractive and cost-effective way to add beauty and functionality to any outdoor space. With the right design and installation, gravel pathways can provide a safe and attractive walkway for years to come. With the help of Gravel Pathways: A Guide to Designing and Installing Gravel Walkways, anyone can create a beautiful and durable gravel pathway that will last for years.